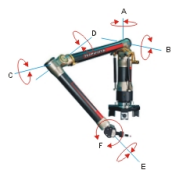
Mount the fixturing base to a stable platform with mounting screws or magnetic chucks.
Place the arm on the fixturing base by screwing the large threaded ring at the base of the arm to the fixturing base.
Once the arm is securely mounted, plug in the power to the arm and verify the power comes on. Then turn off the arm until step 6.
Install WinRDS (version 2.3.5 or later) on your computer.
Please contact Hexagon Technical Support for any 3rd-party files you may need for your hardware.
The WinRDS installer places these two icons on your computer's desktop:
Cimcore Arm Utilities
Quick Check Tools
WinRDS versions earlier than 2.3.5 are not adequately supported for use with Perceptron Contour sensors.
Starting with PC-DMIS 2019 R2, PC-DMIS no longer supports the Perceptron laser sensor. While you may still be able to install PC-DMIS 2019 R2 and later, PC-DMIS displays an error if you attempt to run measurement routines that use the Perceptron scanner. For additional information, please contact Technical Support.
There are two ways to communicate with the Absolute arm:
Via a USB connection
Via a wireless connection if your computer has a wireless Network Interface Card (NIC)
Because of the high communication speed that laser scanners require, we recommend that you connect your computer to the Absolute arm via the USB port when you use a Perceptron Contour Sensor. This document does not cover wireless communication. If you want to connect via wireless communication, please see your Absolute Setup Guide and other documentation installed with the WinRDS installation.
Connect the communication cable into your arm and into one of the USB ports on your computer (or, verify Wi-Fi communication if you are not using a Perceptron Contour sensor).
Turn on the arm's power switch. If you are using a computer running Windows, your computer detects the connection and asks you if you want to install the USB drivers for the arm. Go ahead and install the USB drivers.
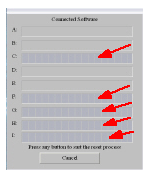
Once the driver installation is complete, double-click the Cimcore Arm Utilities icon on your desktop to launch the Arm Utilities application. When the application starts up, it automatically tries to connect to the machine. If the machine is connected properly, it connects to the arm and asks you to reset the axes. If there are problems, consult the WinRDS and Cimcore documentation.
To reset the axes, move all of the joints on the arm until each joint is zeroed out. As each axis is zeroed out, the corresponding axes bar graphs fill as shown below. When all the axes are homed (zeroed out), the dialog box automatically closes.
At this point, the machine is connected and ready to work.