This procedure calibrates the optical center position of a zoom cell. The optical center is the point in the camera field of view where a feature does not move laterally as the cell zooms. This location information keeps the image view stable as the magnification is changed. This minimizes measurement error between features at different magnifications. The optics hardware should be assembled so as to keep this location near the center of the field of view to allow maximum field of view utilization. The optical center calibration fine tunes the position location in the software. Note that it is desirable to measure related features at the same magnification.
A zoom cell that changes magnification without a lateral shift in the image is said to be parcentric.
A zoom cell that changes magnification without a change in focus is said to be parfocal.
No physical change takes place in the video camera or stage in any way. Any changes you make appear only in the Vision tab of the Graphic Display window.
Before you begin to calibrate the Optical Center, open the Probe Toolbox dialog box, select the Gage tab, and then select the Cross Hair gage. This displays the Cross Hair gage in the Vision tab.
To calibrate the optical center:
On the Calibrate Probe dialog box, from the drop-down list, select Calibrate Optics.
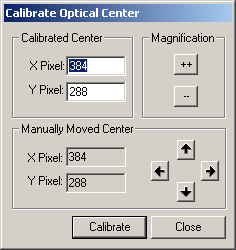
Click Calibrate to open the Calibrate Optical Center dialog box.
Calibrate Optical Center dialog box
Specify the Calibrated Center. PC-DMIS Vision supports any size video frame, though the most common is 1280 X 1024 pixels. Edit the values in the X Pixel and Y Pixel boxes to adjust the position of the optical center of the video frame.
Your service technician has set the initial displayed values. If you make any physical changes to the optics or camera relative to the optics, the optical center values will need to be re-evaluated.
Click the  button to go to the highest magnification level. With the lens completely
zoomed in, you may need to adjust the lighting to see clearly.
button to go to the highest magnification level. With the lens completely
zoomed in, you may need to adjust the lighting to see clearly.
Identify a small dust particle, and manually move the stage so the center of the cross hair coincides with the dust particle.
Click the  button to go to the lowest magnification level. With the lens completely
zoomed out, you may need to adjust the lighting to see clearly.
button to go to the lowest magnification level. With the lens completely
zoomed out, you may need to adjust the lighting to see clearly.
If the center of the cross hair does not coincide with the "dust", click the arrows in the Manually Moved Center area to align the cross hair with the "dust". After the "dust" is aligned, repeat steps 4 through 7.
When there is no perceivable shift or the shift is less than one pixel when going from high magnification to low magnification, click Calibrate to update the Calibrated Center values with the manually adjusted values.
Click Close when parcentricity has been established.