 .
.To enter AutoTune execution, from the Edit
Window toolbar or from the File menu,
select AutoTune .
You can elect to have the AutoTune functionality turned on or off through the AutoTuneDisable entry. For details, see the "AutoTuneDisable" topic in the PC-DMIS Settings Editor documentation.
When you execute your measurement routine in AutoTune execution mode, PC-DMIS Vision steps you through the measurement routine feature by feature.
It performs a test measurement on each feature and then displays the AutoTune dialog box for that feature. The dialog box indicates what has been changed.
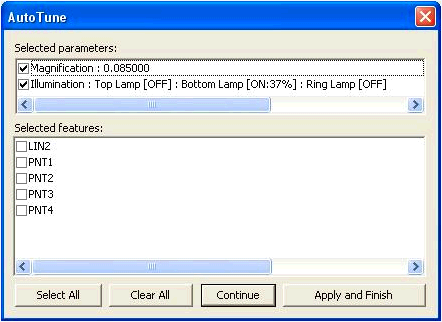
You have the option to apply one or more of those changes to one or more subsequent features in the measurement routine.
Once you are satisfied with the feature and click Continue, PC-DMIS Vision then tests the next feature. It continues doing this until the entire measurement routine has been executed in AutoTune execution. You can also use the Apply and Finish button at any time to apply changes to the selected features and end the AutoTune execution sequence.
Once you finish executing the measurement routine in AutoTune execution, you can return to the PC-DMIS regular execution mode.