TTP User Defined Path Method
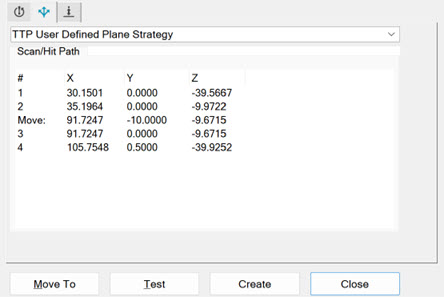
This method teaches the hits that you want to take to measure a plane. To use this method, click points at the desired locations on the CAD or take hits on the machine. The points appear in the Scan/Hit Path area. For example:
Sample TTP User Defined Plane Path
You can use the Scan/Hit Path tab to:
Display hit points and move points
Insert hit points in between other hit points
Import hit points and move points from a text file
Export hit points and move points to a text file
Insert a move point before or after a selected point
Remove a point from the scan path or hit path
Edit Co-ordinates
To edit a hit or move point, double-click on the point. The Insert Point dialog box appears.
Insert Hit Point
To insert a hit point, position your mouse pointer on a point after which you want to insert the point. Use the Teach Point method to insert the hit point.
Right-Click Menu Items
To perform additional functions, right-click in the points list area to display these options:
Import - Select this option to import scan points and move points from a text file.
Here is a sample of a partial text file:
VECTOR,0,-1,0
29.5323410053599,0,-37.6988009316524,SCAN
31.1528542315656,0,-14.9794257639399,SCAN
91.8402432752159,-10,-7.93984347807685,MOVE
91.8402432752159,0,-7.93984347807685,SCAN
102.495262284169,0,-40.8164277082473,SCAN
In this sample:
SCAN - Defines the point added to the hit point
MOVE - Defines the location that PC-DMIS moves the next point to
Export - To export the scan path to a text file, select this option.
Insert Move - To insert a move point to avoid an obstacle, select this option. Move points in the scan path can help to scan a face as one single plane even if the path is not continuous due to any reason.
You can insert a move point before or after the selected scan or hit path point.
To insert a move point before the scan or hit path point, select Before.
To insert a move point after the scan or hit path point, select After.
PC-DMIS opens the Insert Point dialog box.

Insert Point dialog box
You can position the probe and click Probe Pos to insert a move point at that location.
Remove - To delete one point, highlight it in the points list area, right-click, and then select this option.
Clear - To delete all points, right-click in the points list area and then select this option. When the "Remove all points?" message appears, click OK.