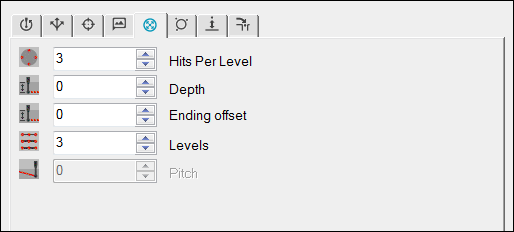

Probe Toolbox - Contact Path Properties tab
The Contact Path Properties tab becomes visible when you have the Auto Feature dialog box open (Insert | Feature | Auto) and a contact probe is enabled. This tab contains several items that you can use to change various hit properties for auto features that use contact probes.
A useful way of visualizing how these properties affect
the measurement is to display pathways and hits by using the Show Hit Targets icon  .
.
Depending on the type of feature that you select in the Auto Feature dialog box, this tab may change to contain one or more of these items:
This item supports the Line, Circle, Ellipse, and Round Slot Auto features. It defines the number of hits that PC-DMIS uses to measure the feature. The number of hits that you specify are equally spaced between the start and end angles.
Circle or Ellipse feature - If the start and end angles are the same or differ by a multiple of 360°, then only one hit is taken at the mutual start and end points.

Location of hits
(A) - Start angle
(B) - 3 hits
(C) - 4 hits
(D) - 5 hits
Round Slot feature - If you enter an odd number of hits, PC-DMIS automatically adds one to the value. This allows for an even number of hits in the measurement of the slot. The software takes half of the hits on the semi-circle at each end of the slot. You must enter a minimum of six hits.
Line feature - You can type any number of hits. Depending on the type of line and the value you enter, PC-DMIS does the following:
If you are creating a bounded line, PC-DMIS uses the calculated length of the line and then spaces the number of hits equally along the line so that the first and last hits are at the start and end points.
If it is an unbounded line, PC-DMIS uses the typed length value and spaces the number of hits equally along the line's direction vector.
If you don't type a length value (or the value is zero), PC-DMIS uses the current probe tip's diameter as the distance between points.
This item supports the Edge Point, Line, Circle, Ellipse, Round Slot, Square Slot, Notch Slot, and Polygon Auto features. It defines where PC-DMIS takes hits on the feature itself and its surrounding sample hits.
Auto Feature |
Description |
Edge Point, Notch Slot |
If you enter one, two, or three sample hits, then PC-DMIS applies the depth value from the measured surface value.
Depth for an Edge Point Auto feature A - Target hit |
Circle, Ellipse, Round Slot, Square Slot, Polygon |
For these features, PC-DMIS usually applies the depth value as a positive offset distance along the IJK centerline vector. The vector originates at each feature's center point. While the software allows negative depth values, this is not recommended for contact-based measurements of these features. For example, consider these two cases:
A negative value in the first case causes the probe to move into the surface material surrounding the feature, possibly causing a collision. A negative value in the second case allows the probe to properly contact the feature. A positive depth value moves the probe above the feature where no material exists for the probe to contact. Important Considerations: Centerline vector (IJK): The vector of the feature should point away from the plane in which the feature lies (2D feature). If sample hits are involved (for 2D or 3D features), that vector should reflect the approach vector for those sample hits. Height or Length: If the feature has a length or height with a negative value, PC-DMIS flips the vector orientation. The orientation of the vector along which the positive depth is applied (IJK') changes based on these conditions: External features: IJK' = IJK in case the feature has a Height or Length greater than or equal to zero. IJK' = -IJK in case the feature has a Height or Length less than zero. Internal features: The IJK' for internal features points in a direction opposite that of external features. |
Line |
The software applies the distance as a positive value along the perpendicular vector to the line vector and edge vector. The line's depth depends on the direction of the hits in relation to the current coordinate system. For example, if you have a typical orientation (X/Right, Y/Back, and Z/Up), and you take your first and second hits from left to right on the model, then you need to use a positive depth value. However, if you take your first and second hits from right to left on the model, then you need to use a negative depth value. |
This item supports the Cylinder and Cone Auto features.
For features with multiple levels, it defines the starting depth of the first level of hits.
It is an offset from the top of the feature.
All other levels are equally spaced between the Starting Depth and Ending Depth.
This item supports the Cylinder and Cone Auto features.
For features with multiple levels, it defines the ending depth of the last level of hits.
It is an offset from the bottom of the feature.
All other levels are equally spaced between the Starting Depth and Ending Depth.
This item supports the Cylinder and Cone Auto features.
It defines the location of the last row in combination with the length of a feature.
If you do not define the length of the feature, then the value for Ending offset references the last row.
Starting with PC-DMIS 2023.2, for the Cylinder Auto feature, PC-DMIS performs a smart calculation of the Ending Offset parameter. This is only available when you load a CAD model.
Once you click to select a Cylinder, PC-DMIS:
Performs a smart calculation of the Ending Offset parameter
Populates the related fields in the Auto Feature dialog box with values that are attainable by the currently loaded probe and tip combination
Draws the related hit targets
The Cylinder feature makes use of the Auto Wrist feature because the smart calculation of the Ending Offset assumes that the position of the tip is oriented along the cylinder's axis. Whether you accept the proposed tip or you select your own tip from the Auto Wrist dialog box, the hit targets always refer back to this assumption.
You can always edit the smart calculation value.
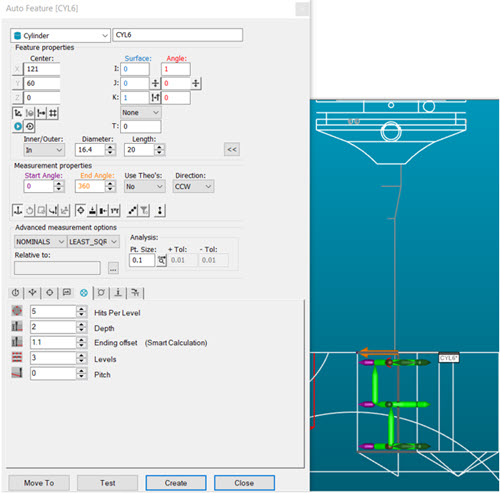
You can see the Ending offset value from the smart calculation in the bottom section (the Probe Toolbox section) of the Auto Feature dialog box below. You can also see the resulting hit targets in the Graphic Display window based on the smart calculation of the Ending Offset:

This item supports the Sphere Auto feature.
It is the same as the description for Hits, except that it defines the total number of hits the software uses to measure the feature among all available rows.
You need at least four hits to measure a sphere.
This item supports the Cylinder and Cone Auto features.
It defines the number of hits per level the software uses to measure the feature.
A value of four would mean four hits per level.
At least six hits and two levels are necessary to measure a cylinder or cone (three hits at each level).
This item supports the Plane Auto feature.
It defines the number of hits taken per row or ring on a Plane feature.
The software uses rows on square patterns.
The software uses rings on radial patterns.
For more information, see "Pattern list" in the "Creating Auto Features" chapter in the PC-DMIS Core documentation.
You must use a minimum of three hits to measure a plane.
This item supports the Polygon Auto feature. It defines the number of hits taken per side on a Polygon feature.
This item supports the Cylinder, Cone, and Sphere auto features. It defines the number of levels the software uses to measure the feature. You can use any integer greater than one. The software places the first level of hits at the Starting Depth and the last level of hits at the Ending Depth.
For a cylinder or cone, the software equally spaces the levels between the Starting Depth and Ending Depth of the feature.
For a sphere, the software equally spaces the levels between the Start Angle 2 and End Angle 2 value in the Auto Feature dialog box.
For a plane, the number of levels and the number of hits determine how many total hits the software uses to generate the auto plane.
This item supports the Circle and Cylinder Auto features. For threaded holes and studs, the Pitch value (also known as "threads per inch") defines the distance between threads along the axis of the feature. This allows for more accurate measurements of threaded holes and studs. If the value is anything other than zero, PC-DMIS staggers the feature's hits along the feature's theoretical axis, spacing them around the feature using the Start Angle and End Angle values in the Auto Feature dialog box.
For details on pitch values for various thread sizes, please consult an appropriate authority (such as the ASME standard).
Circle feature - To follow a standard (clockwise) thread pattern, you need to reverse the starting and ending angles (for example, 720 - 0) and in order to cause the measurement to reverse from a rising pitch to a falling pitch (up/down), you need to negate the value of the pitch.
Example: If measuring a circle with four hits equally spaced around the circle:
The first hit is at the starting angle at the input depth.
The second hit is at a 90-degree rotation to the first and at a depth of (Depth – ((hitnum-1)/tothits * pitch)).
The third hit would be 180-degree rotation from the first hit with a depth of (Depth – ((hitnum-1)/tothits * pitch)).
The remaining hits follow this same pattern.
Cylinder feature - Example: Suppose you measure a cylinder with two levels of four hits equally spaced around the cylinder:
The first hit in each level is at the starting angle at the input depth.
The second hit is at a 90-degree rotation to the first hit and a depth of (Depth - (hitnum-1)/# hits per level * pitch).
The third hit would be 180-degree rotation from the first hit with a depth of (Depth - (hitnum-1)/# hits per level * pitch).
The remaining hits follow this same pattern.
This item supports the Plane and Sphere Auto features. It defines the number of rows that the software uses to measure the feature.