A custom PMMC probe changer model consists of two parts: the rack and the port or ports. These models have the following requirements:
They need to be stored in a ".draw" file format.
They need to have a consistent 0,0,0 coordinate-system location. This needs to be defined in the model's CAD creation software before you import the model into PC-DMIS. The trihedron in this image indicates where this position should be defined:
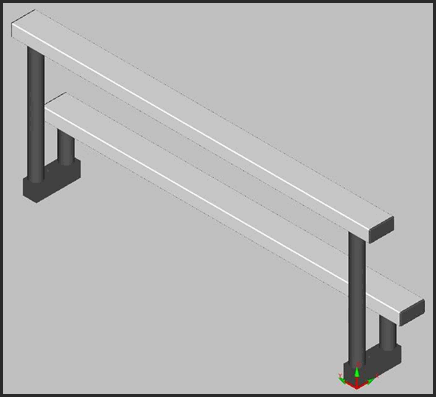
Sample Two-Tier PMMC Model Showing the 0,0,0 Position (Red and Green Trihedron)
All the geometry must be stored in one CAD level.
You can load a custom PMMC Probe Changer model into PC-DMIS by following this procedure:
Create a new measurement routine.
Import the custom model files into PC-DMIS as you would a standard part model. PC-DMIS generates a .cad file for the model during import.
Find out what X and Z values should be for the rack. The Y value is not needed.
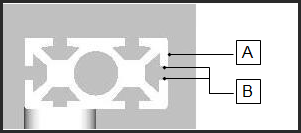
Sample Model of the Rack
To determine the X value, measure a point on the surface, indicated by A in the above graphic. Make a note of the X value.
To determine the Z value, measure the midpoint between the two surfaces, indicated as B in the graphic above. Make a note of the Z value.
Find out the X, Y, and Z values should be for the port.
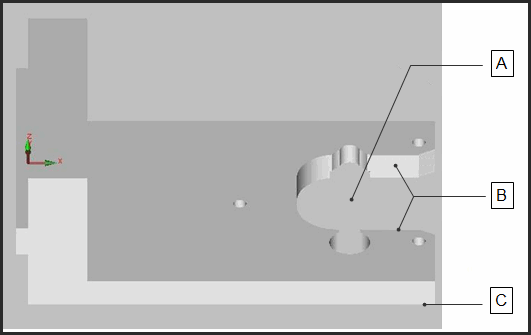
Sample Model of the Port
To determine the X value, measure the center point of the port opening, indicated by A in the above graphic. Make a note of the X value.
To determine the Y value, measure the mid-point between the two surfaces, indicated by B in the above graphic. Make a note of the Y value.
To determine the Z value, measure the bottom surface of the port, indicated by C in the above graphic. Record this value somewhere. Make a note of the Z value.
Inside Windows Explorer, rename the ".cad" extension to a ".draw" extension.
Copy and paste these .draw files into the same directory where the model files that ship with PC-DMIS are located. By default, these are located in the "Models\Toolchangers\" sub-folder under the PC-DMIS install directory.
Create an empty text file named userprobechanger.dat in the same directory as the probechanger.dat file. This should be in the "C:\ProgramData\Hexagon\PC-DMIS\2023.2" folder.
Open the userprobechanger.dat file inside of a text editor, and configure its contents so that a custom model entry follows the format given below. Items in angle brackets indicate where you would put your own text:
ITEM:<DRAW FILE NAME> ARM
comment lower <Rack X> 99999 <Rack Z>
comment garage <Port X> <Port Y> <Port Z> leitz_Ref_2-Tier_port.draw
cadgeom 0 0 0 1 0 0 0 1 0 0
0 1 1 <DRAW FILE NAME>.draw
<DRAW FILE NAME> - The name of the .draw file (without the .draw filename extension).
<Rack X> - The X value of the rack from step 3 above.
<Rack Z> - The Z value of the rack from step 3 above.
<Port X> - The X value of the port from step 4 above.
<Port Y> - The Y value of the port from step 4 above.
<Port Z> - The Z value of the port from step 4 above.
For example, a finished entry in the userprobechanger.dat file for a single-tier rack might look something like this:
ITEM:Custom_Model ARM
comment lower 110.798 99999 394
comment garage 82.75 4.675 -19 leitz_Ref_2-Tier_port.draw
cadgeom 0 0 0 1 0 0 0 1 0 0
0 1 1 Custom_Model.draw
For information on defining a two-tier rack, see the sub-topic below.
If you followed the above procedure correctly, your custom PMMC model should now appear in the Model list of the Animated Probe Changer dialog box. See the "To Display the Probe Changer in the Graphic Display Window:" topic.
Defining a Two-Tier Rack
PC-DMIS also supports a two-tier rack
( click
here to view).
The line "comment upper <Rack X> 99999 <Rack Z>"
is used to specify the upper tier on this type of rack. Therefore, a two
tier model would require your entry in the .dat file to include both "comment
upper" and "comment lower" lines, while a single-tier rack
would need to include the "comment lower" line.
click
here to view).
The line "comment upper <Rack X> 99999 <Rack Z>"
is used to specify the upper tier on this type of rack. Therefore, a two
tier model would require your entry in the .dat file to include both "comment
upper" and "comment lower" lines, while a single-tier rack
would need to include the "comment lower" line.
For example, the following entries show a two-tiered rack definition followed by a single-tiered rack definition:
ITEM:Leitz_Ref_2-Tier ARM
comment upper 82.5 99999 447.7
comment lower 182.5 99999 162.7
comment garage 82.75 4.675 -19 leitz_Ref_2-Tier_port.draw
cadgeom 0 0 0 1 0 0 0 1 0 0 0 1 2 Leitz_Ref_2-Tier.draw
ITEM:Reference_Frank ARM
comment lower 110.798 99999 394
comment garage 82.75 4.675 -19 leitz_Ref_2-Tier_port.draw
cadgeom 0 0 0 1 0 0 0 1 0 0 0 1 1 Reference_Frank.draw
