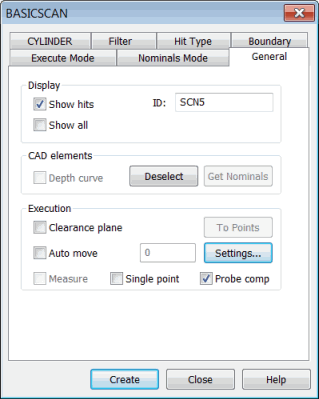
BASICSCAN dialog box - General tab
The following options are available on the General tab in the BASICSCAN dialog box (Insert | Scan | Circle, Cylinder, Axis, Center, or Line). For more information about the BASICSCAN dialog box, see "Common Functions of the BASICSCAN Dialog Box".
Display Area
Show hits check box: If you select this check box, PC-DMIS displays each scan in the Edit window as a set of the measured hits surrounded by a scan object and an end measured object.
If you choose this option, all of the hits appear in the Edit window.
If you don't select it, the hits are not shown.
ID box: Displays the current ID for the scan being created. You can change the ID.
Show all check box: If you select this check box, PC-DMIS displays all of the scan parameters in the Edit window, such as:
Cut planes
Boundary points
Direction vector (DirVec)
Initial approach vector (InitVec)
If you don't select the check box, PC-DMIS displays only these data types in the Edit window:
Increments
Techniques
Hit Types
CAD Elements Area
Depth curve check box: The depth curve is used during FINDNOMS operations. Whenever PC-DMIS has to find nominals from curve elements, it takes the vector of the Depth CAD element and crosses it with the vector from the other selected CAD elements to get a plane. It then pierces the plane to get the proper nominal. If many CAD elements are selected, the closest pierce point is used as the nominal point. When CAD wireframe data is being used, PC-DMIS looks for the wire frame data in pairs.
Deselect button: If you select an incorrect surface, you can click Deselect to deselect the selected surface (or you can press Ctrl and click on the surface to clear it). You can also click Deselect multiple times to deselect one surface at a time from a group of highlighted surfaces until all are deselected.
Get Nominals button: Use this button to find the nominal after a scan has been learned or executed. PC-DMIS finds the nominals for the scan from the CAD data that is available.
Execution Area
Clearance plane check box: To insert a CLEARP MOVE a predetermined distance relative to the current coordinate system and part origin, before taking the first hit, select this check box.
After the last point in the scan is measured, the probe stays at probe depth until called to the next feature. The use of clearance planes reduces programming time because the need to define intermediate moves is reduced. (For additional information on clearance planes, see "Parameter Settings: Clearplane Tab" in the "Setting Your Preferences" chapter.) This option is only available for DCC scans.
Auto move check box: To turn on Auto Moves for each scan, select this check box. Once it is selected, you can type the distance for the move in the box.
Measure check box: If you select this check box, the measurement process for this auto feature begins immediately after you click the Create button.
Single point check box: To consider each hit as a single measured point, select this check box. If you select this check box, PC-DMIS makes each hit a measured point and inserts it into the measurement routine. This sequence will happen after the manual scan has been reduced. If the scan is in DCC mode, it takes place after the scan has been learned.
Probe comp check box: Use this check box to specify whether or not PC-DMIS turns on probe compensation for this specific scan. In most cases, you probably don't need to perform this compensation, since a scan's FINDNOMS operation automatically does it. However, if you don't have CAD and want to reverse-engineer a part, you should select this check box.
To Points button: To run a process where the individual points that make up an existing scan can be converted into single points after execution, select this button. The scanned set is then deleted.
For example:
Place your cursor on a scan using hit data in the Edit window.
Press the F9 key to display the BASICSCAN dialog box.
Select the To Points button. PC-DMIS converts all hit data into single points and deletes the scan from the Edit window.
Settings button: Enables you to change the probe setting that is relevant to scanning: scan speed and scan point density.