Creating a 2D Radius Gage
To create a 2D Radius Gage with a Cross Section:
Create the cross section.
Select the Cross Section
Slide Show button ( )
from the Pointcloud toolbar (View
| Toolbars | Pointcloud) to view the cross section in a 2D
view.
)
from the Pointcloud toolbar (View
| Toolbars | Pointcloud) to view the cross section in a 2D
view.
Hold the Shift key down and point to the desired
radius. A display widget appears. The display widget shows the nominal,
measured, and deviation values for the radius.
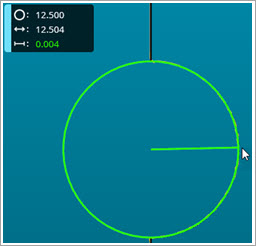
2D Radius Gage display widget showing the nominal,
measured and deviation values for the radius
Click to select the radius. A widget dialog
box appears.
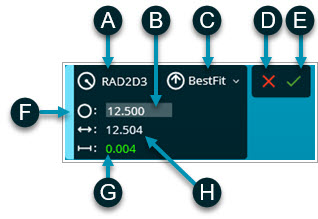
A - 2D Radius Gage ID
B - Radius nominal value
C - Algorithm used to
calculate the radius
D - Cancel button
E - Create button
F - Use the handle to
move the widget dialog box
G - Radius deviation value
H - Radius measured value
2D Radius Gage widget dialog box
From the widget dialog box, you can do the following:
Change the 2D Radius Gage ID (A)
and the nominal value (B).
From the list (C),
select the algorithm the software uses to calculate the radius.
Click the Create
button (E) to create the radius gage
or the Cancel button (D)
to close the widget dialog box without creating the radius gage.
Reposition the widget. To do this, point
to the handle on the left side of the widget (F).
Click and drag the widget in the Graphic Display window to reposition
it.
When you create the 2D Radius Gage, PC-DMIS
creates its associated command in the Edit window. You can create
additional radius gages as needed.
Once you create a 2D Radius Gage, you can use it in
Location and Distance Dimensions, and Constructions. For Location Dimension,
Form is not supported.
To change the radius settings:
Edit them directly in the Edit window.
Click the radius gage command in the Edit window,
and then press F9 to open the 2D Radius Gage
dialog box to make your changes.
How the 2D Radius Gage is Calculated
When the cross section has both nominal (black
polyline) and measured (yellow polyline) data:
Calculating the Nominal 2D Radius
Starting from the initial picked measured point,
the nominal radius is found on the nearest black polyline. The software
calculates the nominal (theoretical) radius for a least square best
fit circle, using all the nominal points that are within 0.005 mm
standard deviation.
Calculating the measured 2D Radius
The software calculates a least square best fit
circle, using the actual points on the yellow polyline that are associated
with the nominal points.
When the cross section has only nominal data
(black polyline):
Starting from the initial picked nominal point,
the software finds the radius on the nearest black polyline. The software
calculates the nominal (theoretical) radius for a least square best
fit circle, using all the nominal points that are within 0.005 mm
standard deviation.
When the cross section has only measured data
(yellow polyline):
Starting from the initial picked measured point,
the software calculates the radius for a least square best fit circle.
The software uses all the measured points within 0.050 mm standard
deviation and a search distance of 0.25 mm to find any additional
segments that belong to the radius.
More:
2D
Radius Gage Overview
2D
Radius Gage Dialog Box