Multiple Run Mode adds the measured data for each run of a measurement routine into a report file based on the template layout.
To create a template for multiple run, follow these steps:
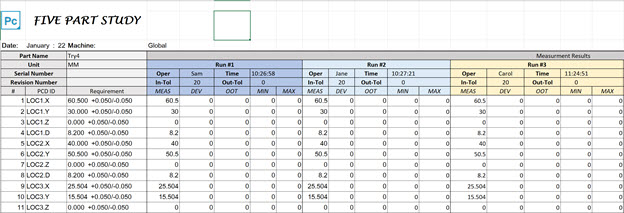
Multiple Dimension Fields
Example of Multi Run Form for each execution
To do this, you need to associate the Measured Value under the Dimension group with the required cells in the template. You can also associate the Deviation, Out of Tolerance, Min, and Max.
To associate multiple cells with a Measured Value, follow one of the methods below:
There are two ways to select multiple consecutive cells in a row or column:
Method 1
Hold down Shift and click the first cell in a row or column. Continue to hold Shift and click the last cell in the row or column.
Method 2
Click the first cell to select it. Then drag the pointer over the cells in the same row or column to multi-select them.
To select multiple non-consecutive cells, hold down Ctrl and click the cells. Click a selected cell again to unselect it.
Drag the Measured Value field under the Dimension group to the selected cells. The field in the template shows {Measured Value}.
This procedure associates the Measured Value field with the required cells. You can follow the same steps for Deviation, Out of Tolerance, Min, and Max fields to associate with the required cells.
After you associate the fields in rows or columns, select all of the associated data fields, right-click on them, and select Set as data area. This sets the data area and highlights the area with a yellow background.
You need at least one cell associated with the PCD ID field.
If you would like to fill the data for five runs, you must associate five cells with the Measured Value field.
Multiple Part Data Fields
PC-DMIS can populate the Part information (Trace and Summary fields) for each run based on the template layout.
To fill the part information in a Multi Run form, you need to associate the cells with the trace and summary fields. You can follow the above steps for Measured Value to do this.
After you associate the part data, you need to set a repeatable field area. The repeatable field area consists of the column or row of cells where the trace or summary field is associated and repeated. You can have many repeatable field areas in an Excel form.

This example uses the image above to show how to create a repeatable field area:
From the Excel form, select the cells E6 through AB6.
Right-click and select Set as repeatable field area. The cells that you select turn green. This area becomes a repeatable area in this form.
Select cells E7 through AB7.
Right-click and select Set as repeatable field area. The cells that you select turn green. This area becomes another repeatable area in this form.
You can define these areas according to your needs. Each area must repeat the trace and/or summary fields.
PC-DMIS fills these fields with related field values for each run.
Your template defines a limited number of rows and columns runs to store data from you measurement results. If PC-DMIS cannot append to a report file because all the defined rows or columns in the file are full, it displays a message that the report is full.
For example, if your template has only five rows or columns, the excel report can store data for up to only five runs. On the 6th run, PC-DMIS would display the error message.
To get around this and record the data from runs that exceed the defined rows or columns, do one of the following:
Rename the generated Excel form file to something else. This file is in the folder defined in the Report Settings dialog box and then re-execute the Excel Form report command.
Modify the template to add more rows or columns to accommodate the data that PC-DMIS collects. You need to associate a measured value field (drag and drop Measured Value onto a cell) and then re-execute the Excel Form report command.
Make sure that the command uses the same Excel template for all runs. Also, make sure that the data area in the template contains the {PCD ID} and {Measured Value} fields. The number of {Measured Value} fields in the data area determines the number of runs.