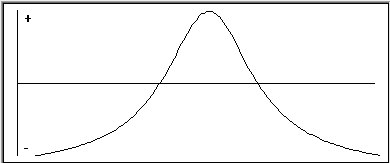

Auto focus graphs the results of the focus by showing the focus score (Y) against time (X). A sharper focus will have a higher focus score.
Auto focus should result in a rounded curve (an inverted "U"). Use the Manual Focus option when you have no DCC to automatically drive the Z axis. If the graph shows a sharp increase in focus score, try reducing the speed of movement. Also, you need to ensure that your range of travel is sufficient, so that you see the base of the curve on both sides.
If the graph is not smooth, ensure the illumination is sufficient so that surface texture is evident.
Auto Focus on a Manual Machine:
Roughly find the in-focus position and then move out of focus.
Click the Auto Focus button to start the graph and record the focus score.
Move through the focus position by moving a single axis (usually Z).
Continue moving the Z axis until you have moved through the focus position, and the graph is a well-proportioned, gradual, inverted U shape.
When the specified duration has been reached, the detected focus position is displayed in the live image view.
PC-DMIS shows a message to accept the focus results or retry the focus. Click Yes to accept the results or No to retry the focus.
If there is a problem, click the Reset Focus Graph button to clear the graph data and start this process over.
With focus on a manual machine, you need to move the Z stage at a slow and steady speed. PC-DMIS shows a warning in the Live Image View window if you move too fast, or the distance moved is too long or too short.
On some machines, you may find you get a better focus result by specifying a longer duration, and then moving forward and backward through the focus position three or four times to get a series of U shapes on the graph.