Edit Feature Appearance dialog box
Selecting the Edit | Graphic Display Window | Feature Appearance menu option opens the Edit Feature Appearance dialog box. This dialog box alters feature identifications (termed "feature IDs") within a measurement routine, feature colors, and feature ID labels.
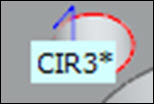
The following example shows a legacy feature ID label and a feature that is modified using the Edit Feature Appearance dialog box. Various colors demonstrate the different parts of the label.
Red - a modified Feature color. By default, the colored bar at the top of the ID label also changes to match the color of the circle.
White - the default Background color.
Blue - a modified Line color.
An enlarged screen shot of an example of a feature ID label and a feature with a modified appearance
Editing Feature IDs
You can edit a previously assigned feature name by double-clicking on the desired feature in the list box. An Edit ID dialog box appears, which allows you to type a new identification.
Edit ID dialog box
You can also change feature IDs in the Edit window. Highlight the desired ID, and type a new identification. Be aware, however, that in the Edit window, PC-DMIS does not track feature identifications and therefore does not warn you if duplicate IDs are assigned. Use caution when making changes if you do not want identical IDs.
Never use any of the mathematical characters ( -, +, /, or * ) in an ID label. This causes problems when you attempt to use the feature ID inside PC-DMIS expressions.
This dialog box contains two main areas:
The Features options area - Used to modify the display of the part's features themselves.
The Text labels options area - Used to modify the feature ID labels in the Graphic Display window.
The Use legacy graphics labels check box controls the appearance of the feature labels (including Dimension Info and Point info boxes) in the Graphic Display window. The software uses legacy labels for new measurement routines. You can clear this check box to use newer feature labels and save that setting with your routine. The purpose of the new labels is to use the same labels on the Graphic Display window and your generated reports.
New feature labels don't use the line or background colors from the Edit Feature Appearance dialog box. Instead, you can control how the new feature labels look by modifying the underlying CAD_ID.LBL label template. You can do that from the Label Template Editor. To access this editor, select File | Reporting | Edit | Label Template menu option. For more information on label templates, see "About Labels and Label Templates" in the "Reporting Measurement Results" chapter.
A legacy label |
A new label |
If you right-click on a Dimension Info box with new graphics labels, the software opens the Properties dialog box for that label so that you can see the pathway to the underlying template in the Template Path field.
To change the graphic options for features or feature ID labels, select the desired options from the dialog box, click Apply and then OK.
More: