Select Operation | Graphic Display Window | Rotate to display the Rotate dialog box.
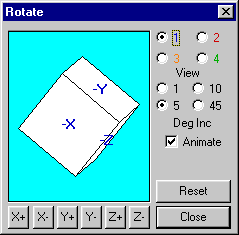
Rotate dialog box
This dialog allows you to rotate a part drawing in three dimensions. Each view of the part can be rotated up to 45 degrees per rotation. You can also activate this option by selecting the 3D Rotate mode icon on the Graphic Modes toolbar.
To rotate the drawing using the dialog box:
Select the view to be altered (1-4).
Determine the amount of rotation by selecting the degree increment (1, 5, 10, or 45).
Click on the desired axis button to rotate the drawing in the indicated direction.
Click the Reset button to snap the rotation of the drawing in the Rotate dialog box and in the Graphic Display window to the closest axis.
If you select the Animate check box, PC-DMIS dynamically re-draws the part in the Graphic Display window as it is rotated.
See the "3D Rotate Mode" for additional information on rotating.
To quickly rotate your part with or without the Rotate dialog box open, press CTRL + right-click and drag the mouse, or if your mouse has a center mousewheel button, hold the mousewheel button and drag the mouse. Also, you can double-click the mousewheel button at any time to perform the same action as the Reset button on the Rotate dialog box: it snaps the rotation to the closest axis. (Note however, that if you have a Vista operating system and you click the mousewheel button, it instead activates the Switch Between Windows scrolling functionality.)
Determining the Point of Rotation with a CAD Model Imported
There are two ways to determine the point of rotation, depending on where the mouse is when you first click the right mouse button. Either the mouse is over the Graphic Display window background, or it is over the part's CAD.
If the mouse is over the Graphic Display background, the part rotates about the part's origin.
If the mouse is over the part, the part rotates about the point on the part directly below the mouse pointer.
Determining the Point of Rotation without a CAD Model Imported
If you don't have a CAD model imported into the Graphic Display window, PC-DMIS can rotate about a user-defined point instead. This helps when there are relatively large distances between measured objects or CAD objects. Previous to PC-DMIS 2009 it was difficult to rotate the Graphic Display window in such cases (either using the Rotate dialog box or by using the mouse) because it usually resulted in objects rotating out of the screen display.
If the Rotate dialog box is active, PC-DMIS treats the screen center position as if there was a mouse click.
If you select the Pierce CAD on 3D rotate check box from the SetUp Options dialog box, then PC-DMIS rotates about the pierced point if there is one.
If it cannot find a pierced point, PC-DMIS instead uses the closest display object (pixel) and rotates about that point. If the closest object is a CAD object, then the point it uses is the closest point on the closest CAD object.