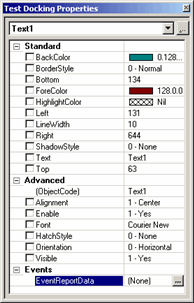
Each object that you add to a template or form has a set of properties (or attributes) that control the object’s position, size, colors, font, text, name, and so on. Each object also has a set of event handler functions that PC-DMIS triggers when certain events occur. For example, an event can occur when you click or double-click the mouse on that object.
You can use the Properties dialog box to view and modify properties and event handlers. Another name for this dialog box is "property sheet".
Viewing an Object's Properties
To view the Properties dialog box, select an object (single-click within its boundaries) and then right-click. Following is an example of a property sheet that shows text object Text1 and its various properties:

Sample Properties dialog box
Viewing Object Properties
A list appears at the top of the Properties dialog box. This list contains an entry for each object in your template or form. It also contains some objects that always exist and you cannot delete, such as the main editing area. In the Report editor, the main editing area is called the Page. In the Label Editor and the Form Editor, it is called The Frame/The View.
To view the properties for an object in your form or template, select a different object from this list. If you have a report template with more than one section, this list shows only the objects in the current section.
For report templates, you can access an additional object called Report only from this list. It has two properties in the Advanced category that you can use to specify your own external executable (an .exe file) to collect user-assigned properties. These properties are Template Selection Program and Measurement Routine Execution Program. PC-DMIS runs the specified measurement routines while you select a template and execute a measurement routine, respectively.
Property Organization
Each object's properties are in three main categories:
Standard - These properties control color, position, and line styles.
Advanced - These properties control whether the object is enabled or visible.
Events - These properties enable you to use the BASIC language to code specific instructions when events occur.
To expand a category, click the + symbol to the left of the category. To collapse a category, click the - symbol.
ActiveX and OLE objects have an additional section. For more information, see "ActiveX Object" and "OLE Object".
For descriptions of properties, see "Common Properties". If that topic does not contain a description of a property, view object-specific documentation in "The Object Bar".
For more information on events, see "About Events and Visual Basic Code".
Name Identifier
When you insert an object into a template or form, PC-DMIS automatically assigns a unique name identifier to the object's ObjectCode property. Subsequent objects of the same type have the same name, with an incremented numerical value behind it. For example, the editor automatically names your first Text object "Text1". It names subsequent Text objects "Text2", "Text3", and so on.
You can change this value to a different name. If you change it, ensure that you give it a unique name. If you modify that object's name identifier, you must also update any BASIC scripting that uses an object's code.
Changing Property Values
To modify a property, select it and then click its value. If a list appears, select a new value. You can also type a new value in an editable field.
Expressions as Property Values
Some property values can hold reporting expressions instead of a constant value, just as a cell from a GridControlObject can hold expressions. Remember to preface the expression with an equal sign (=). For example, suppose that you have a Text object in a label template, and you also want it to display the current feature's ID instead of other text. In the Text property, type "=ID". When PC-DMIS executes the measurement routine, the object pulls the feature's name from PC-DMIS and displays it in that Text object.
More:
Working with User Assigned Properties