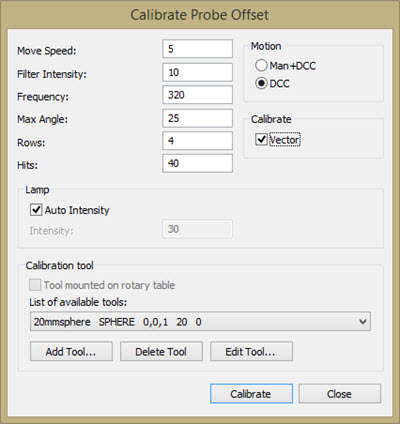
The options on the Calibrate Probe Offset dialog box determine the procedure that the software uses for the calibration. To access this dialog box, define your probe in the Probe Utilities dialog box (Insert | Hardware Definition | Probe) and then click Measure.
Requirements Prior to Calibration
To begin the calibrating process, you must define a qualification tool. The only tool type supported is a sphere. From the List of available tools, select a currently-defined qualification tool.
To define a new qualification tool to add to the list of available tools, click Add Tool.
To change the configuration of the currently-defined qualification tool, click Edit Tool.
To delete the currently-defined qualification tool, click Delete Tool.
Click the Measure button to display the Calibrate Probe Offset dialog box.

The settings on this dialog box are:
Move Speed: Sets the percentage of the maximum machine speed that the software uses during the calibration process.
Filter Intensity: Sets the CWS filter intensity. For details, see "CWS Parameters" in the PC-DMIS Vision documentation.
Frequency: Sets the CWS frequency. For details, see "CWS Parameters" in the PC-DMIS Vision documentation.
Max Angle: Sets the maximum angle away from the sphere pole or zero angle point for the pattern of points. The best angle depends on the CWS probe being used. Different probe heads have different maximum measurement angles.
Rows: The number of rows in the pattern of measurement points.
Hits: The number of hits in the pattern of measurement points.
Lamp Auto Intensity: Sets the lamp intensity to automatic. For details, see "CWS Parameters" in the PC-DMIS Vision documentation.
Lamp Intensity: Sets the lamp intensity when not in automatic mode. For details, see "CWS Parameters" in the PC-DMIS Vision documentation.
Motion Man+DCC: Requires a manual point at the beginning of the calibration. PC-DMIS executes all subsequent points in DCC mode.
Motion DCC: Measures the sphere automatically in DCC mode. Ensure you position the probe with the appropriate clearance for any wrist rotation and movement to the sphere measurement points.
Calibrate Vector: Enables the vector calibration measurements. The software measures the sphere two additional times after the tip offset calibration in order to calculate the vector of the CWS probe.