
Measured Circle button
Use the Measured Circle button to measure the diameter, roundness, and position of the center of a hole or stud that is parallel to a reference plane; i.e. the perpendicular section of a cylinder aligned with a reference axis.
To create a measured hole or stud, you must take a minimum of three hits. The plane is automatically recognized and set by the system during measurement. You must pick points that are uniformly distributed on the circumference.

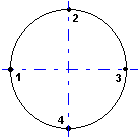
Example of a circle with four points

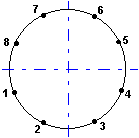
Example of a circle with eight points

Measure Single Point Circle toolbar button
You can also create circles from a single point by using the Measure Single Point Circle toolbar button. This is useful when you attempt to measure a hole with a probe whose sphere size is larger than the hole's diameter and therefore cannot fit entirely into the hole to take the usual minimum three hits required. For more information, see "Creating Single-Point Measured Circle Features" in the PC-DMIS Portable documentation.