(For information on accessing the dialog box where this item is located, see "Setting Up the Screen View".)
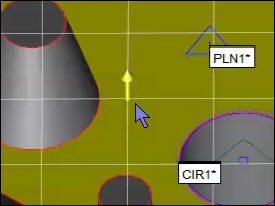
From the View Setup dialog box, select a 3D Grid check box and click Apply to turn on the 3D grid for the selected view. The origin of the 3D grid is always located at the part's current alignment. If you enable a grid, and attempt to create a QuickFeature point (Vector, Edge, and Angle), the software snaps the point to the nearest intersection on the grid:
Vector Point snapping to an intersection
For information on creating QuickFeatures, see "Creating QuickFeatures by Hovering over CAD Elements" in the "Creating Auto Features" chapter.
From the View Setup dialog box, the 3D Grid Setup button brings up the 3D Grid Setup dialog box where you can modify the grid spacing and label inset.
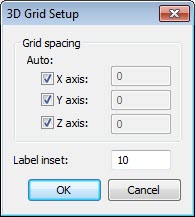
3D Grid Setup dialog box
Modify the grid line spacing by typing a value in the X axis, Y axis, and Z axis boxes or mark the Auto check box for that axis to have PC-DMIS automatically compute reasonable spacing.
Grid line labels are placed around the outside of the window. These lines follow the current alignment defined in the Edit window. You can move these labels along the lines by changing the value shown in the Label Inset box. This value determines the pixel buffer size that PC-DMIS places between the outer edge of the Graphic Display window and the 3D grid labels. You can choose any integer value between 0 and 1000.
Click OK to display the 3D grid in the Graphic Display window.
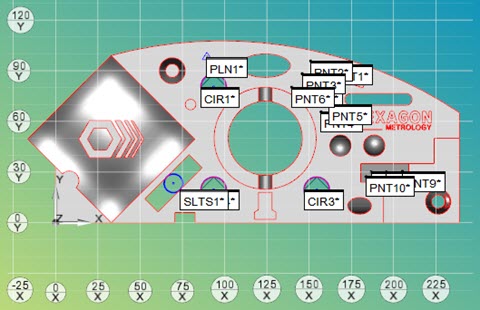
Example of a 3D Grid with Label Inset of 10 pixels in the X-Y Plane
There are three possible grids that can be drawn:
X-Y
Y-Z
Z-X
PC-DMIS draws only one grid at a time. The grid drawn depends on the axis plane rotated closest to your screen (determined by the axis indicator). For example, the following axis indicator from the Graphic Display window shows the X-Y axis plane facing the user; PC-DMIS draws the X-Y axis grid.

Axis Indicator showing the X-Y plane.
The color of the 3D grid can be modified from the Screen Color dialog box. See "Changing Screen Colors".