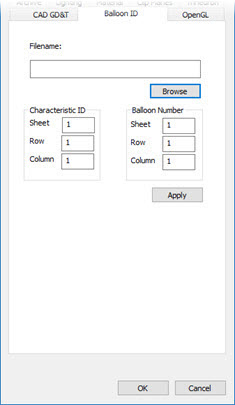
From the Edit menu, point to Graphic Display Window, and choose Cad Balloon ID.

CAD and Graphic Setup dialog box - Balloon ID tab
The Balloon ID tab uses a Microsoft Excel file to map characteristic IDs to balloon numbers. For information on showing the characteristic IDs, see the "Showing and Hiding CAD GD&T Characteristic IDs" subtopic under the "Working with CAD GD&T Callouts" topic.
You can use an Excel file with any of these file extensions: .xls, .xlsx, .xlsm
How It Works
Once you supply a pathway to an Excel file with data, and click Apply or OK, PC-DMIS uses an internal Excel reader to read the file.
Once you choose to display characteristic IDs, PC-DMIS reads the Excel file and uses the info on the Balloon ID tab to locate the starting characteristic ID.
For each ID in the defined characteristic ID column, PC-DMIS checks if that ID number is in the model.
If so, PC-DMIS looks up the corresponding balloon number and replaces that characteristic ID with the balloon number.
This does not replace the underlying characteristic IDs embedded in the model.
Items on the Tab
Filename - This box defines the full path to the Excel file. You can use the Browse button to select the folder.
If this box contains a pathway to a valid Excel file, PC-DMIS uses the Excel file to determine what balloon number to show for each characteristic ID.
If this box does not contain a pathway to a valid Excel file or is empty, PC-DMIS shows the default characteristic IDs.
Characteristic ID - This area defines the sheet, row, and column for the first cell in a column of characteristic IDs.
Balloon Number - This area defines the sheet, row, and column for the first cell in a column of balloon numbers.
Suppose you have an Excel file with this information on sheet 1:

To replace the numbers, you would set these values in the Characteristic ID area:
Sheet - 1
Row - 2
Column - 1 (for column A)
And you would set these values in the Balloon Number area:
Sheet - 1
Row - 2
Column - 2 (for column B)
When PC-DMIS encounters the characteristic ID of 20 in the model, it would replace it with the balloon number of 1B, and so on.