 on the Pointcloud
toolbar (View | Toolbars | Pointcloud). The
button has two states, Play and Stop (default).
on the Pointcloud
toolbar (View | Toolbars | Pointcloud). The
button has two states, Play and Stop (default).You can simulate the scan of an imported pointcloud
with the Simulate Scan button  on the Pointcloud
toolbar (View | Toolbars | Pointcloud). The
button has two states, Play and Stop (default).
The simulation imports the scan passes in the order they were originally scanned. You can import XYZ and PSL files to simulate scans.
This allows you to do the following:
You can visualize how the pointcloud was originally scanned.
You can see the result of real-time filters because, during the simulation import, the software applies any active settings on the Laser Data Collection Settings dialog box to the imported pointcloud data. For details on the Laser Data Collection Settings dialog box, see the "Laser Data Collection Settings" topic in this documentation.
To simulate a scan:
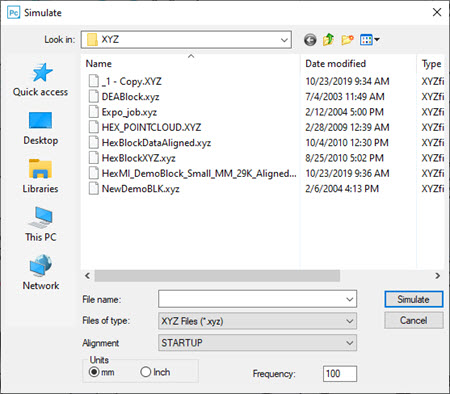
Click the Simulate Scan button to display the Simulate dialog box.

Use the Simulate dialog box to navigate to the Pointcloud file that you want to import. Use the Files of type list to filter the file types to display.
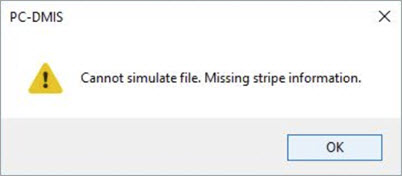
The pointcloud file must contain stripe information. If the file you select does not contain stripe information, as soon as you click the Simulate button, PC-DMIS displays an error message that says it cannot simulate the file because it's missing stripe information. It then aborts the import process:

If the file contains information, the import continues. PC-DMIS imports the pointcloud data into the first Pointcloud operator it finds below the current cursor position in the Edit window.
If the existing Pointcloud operator already contains data, the new data is added to the existing data.
If a Pointcloud operator does not exist, PC-DMIS creates a new Pointcloud operator.
From the Simulate dialog box, enter a value in the Frequency box to set the speed of the simulation during the import process. The default is 100 and the range is 1 to 500 inclusive from slowest to fastest speed.
Click the Simulate button. PC-DMIS simulates the scan as it imports the pointcloud data.