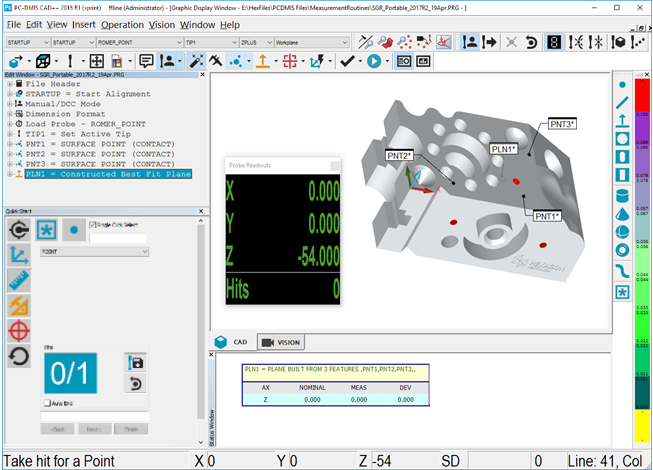
Some PC-DMIS user interface elements that are particularly useful when you use portable devices. The image below shows a sample Portable user interface.

Example of a Portable user interface
Click an area in the above image to display information on that section of the Portable user interface.
The following user interface elements are discussed in greater detail elsewhere in this documentation:
Also, the following user interface elements are discussed in greater detail in the PC-DMIS Core documentation:
Menu bar - This area of the interface allows you to access all PC-DMIS functionality from the menu bar and the corresponding drop-down lists. For more information on the menu bar, see "The Menu Bar" in the "Navigating the User Interface" chapter in the PC-DMIS Core documentation.
Graphic View toolbar - This area of the interface allows you to change the view of the Graphic Display window. For more information on this toolbar, see "Graphic View Toolbar" in the "Using Toolbars" chapter in the PC-DMIS Core documentation.
Graphic Item toolbar - This area of the interface toggles the display of Graphic Display window labels. For more information on this toolbar, see "Graphic Items Toolbar" in the "Using Toolbars" chapter in the PC-DMIS Core documentation.
Graphic Display window - This area of the interface displays the geometric features that are being measured. For more information on this window, see "The Graphic Display Window" in the "Navigating the User Interface" chapter in the PC-DMIS Core documentation.
Dimension Colors bar - This area of the interface shows the colors for dimension tolerances and their associated scale values. For more information on this item, see "Using the Dimension Colors Window (Dimension Colors Bar)" in the "Using Other Windows, Editors, and Tools" chapter in the PC-DMIS Core documentation.
If your LMS license or portlock is programmed to support all interfaces, you need to run the PC-DMIS installation program with one of the following switches: /Interface:romer, /Interface:leica, /Interface:smxlaser, or /Interface:faro.
You can add these case-sensitive switches by creating a shortcut to the PC-DMIS Setup.exe file and appending the needed switch to the Target box (for example: C:\Download\PC-DMIS\Setup.exe /Interface:romer). If you install with the LMS license or portlock programmed for a specific interface, the software installs the correct interface automatically.
You can also switch to another Portable interface from the menu before you load a measurement routine. For more information, see the "Switchable Portable Interface" section of this documentation.
More: