 ), and you then select one
or more GD&T tolerances to import from the GD&T
from Capture window.
), and you then select one
or more GD&T tolerances to import from the GD&T
from Capture window.PC-DMIS uses this widget to import GD&T tolerances
from a drawing with Optical Character Recognition (OCR). The widget appears
if you select GD&T Selection Mode (from File)
( ), and you then select one
or more GD&T tolerances to import from the GD&T
from Capture window.
You can access GD&T Selection Mode (from File) from one of these:
File | Import menu
There are often multiple steps with instructions on the OCR widget for a given GD&T tolerance definition. For example, you often need to first select a datum feature (or features) from the CAD model and later select the considered feature (or features). These instructions and your selections occur across multiple steps.


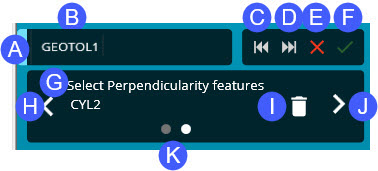
OCR Widget for the highlighted GD&T tolerance
This handle lets you drag and reposition the widget.
Feature - This box defines the name of the GD&T tolerance or step.
Back - This button only appears if there are multiple GD&T tolerances on a .pdf page or a capture of multiple tolerances, and you have skipped one or more of them with the Skip button. If you then click Back, the software returns to the skipped tolerance and highlights it in the Selection Preview window.
Skip - This button appears with a .pdf import or with a capture of more than one GD&T tolerance. By default, for each tolerance, you define the datums first (or datum targets). In this case, this button skips the current datum definition (or datums target definition). Once you move onto defining the rest of the GD&T tolerance, this button skips the highlighted GD&T tolerance. It then highlights the next available GD&T tolerance on a .pdf page or capture. For a file import, if there's only one GD&T tolerance on a page, the software asks if you want to proceed to the next page. If there are no more .pdf pages with GD&T tolerances, the software asks if you want to exit the GD&T import process. For an imported file, if you need to go back to a skipped item on a previous page, you must start the file import again.
Cancel - This button cancels the OCR process and closes the OCR widget and the Selection Preview window.
Apply - This button accepts the selected datum targets or features for the GD&T tolerance and moves onto the next part of the import or onto the next tolerance.
This field shows the instructions for the current step. You need to use QuickFeatures to select the indicated feature in the Graphic Display window.
Previous - This button goes back one step.
Remove - This button removes the selected feature from the current step.
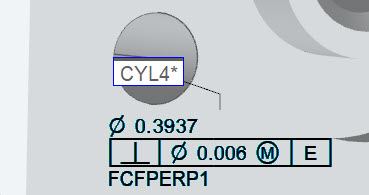
Next - This button accepts the selection for the step and goes to the next step in the definition. The software enables this button once you define the minimum number of features. The temporary callout in the Graphic Display window updates as you progress through the definition:

Temporary callout
These dots show the number of steps to define one or more datums or to define a single GD&T tolerance. The white dot indicates the current step.
Skip current feature definition - This skips over the current datum definition.
Pause (not pictured)
- The Pause button ( )
only appears if your selection or file contains datum targets. The
software enables this button once you have defined all the various
datum target points and the widget shows "Datums Target Definition
Completed". This button pauses the GD&T import process so
that you can use PC-DMIS to finalize datum definitions from your datum
targets. This button is useful because datum creation from datum targets
can be a complex process. You may need to construct features or create
alignments or do other work in PC-DMIS. The Pause
button gives you nearly full access to PC-DMIS to do that work. Once
you finalize the datum definitions from the datum targets, you can
click Resume (
 ) to
continue the GD&T import process.