Edit window in Command mode
PC-DMIS uses different background colors, command text colors, and text characters to offset information in Command and DMIS modes. This coloring and text formatting may seem somewhat confusing at first, especially if you are used to very old versions of PC-DMIS that only used a single color. If you don't like the default color scheme, you can configure your coloring scheme similar to that of old versions or come up with your own. For information on how to do this, see "Defining Edit Window Colors" in the "Setting Your Preferences" chapter.
The colors and formatting are valuable tools that can help increase your productivity. The following describes these tools.
Background Colors
Different background colors help you know what commands are marked, unmarked, have errors, are active, or are being stepped through. You can find the definitions for these background colors in the Color Editor dialog box (Edit | Preferences | Edit Window Colors) for the Edit window.

Edit window background color information in the Edit window's Color Editor
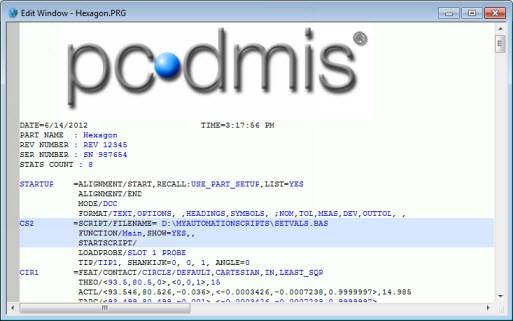
Consider this example screen shot:

Edit window example showing the coloring scheme
A - A light-green background means the command has been marked for execution.
B - The light-blue background means the command has not yet been marked for execution.
C - A slightly darker background color (either darker green for marked commands or darker blue for unmarked commands) shows the current active command.
Command Text Colors
Black text - Any non-editable command text. You cannot change this text.
Blue text - Any editable command text.
Red text - For non-dimension commands, this indicates an error in the command text. The command is skipped during measurement routine execution. Errors come from unsupported commands, unsupported probe types, and syntax errors (usually while working with expression or scripting commands). For dimension commands, red text indicates that the dimension is out of tolerance.
For details on how PC-DMIS reports dimensions that use skipped features during execution, see the "Reporting a Dimension Using a Feature Skipped During Execution" topic in this documentation.
If your measurement routine contains unsupported commands (commands in red text), check it thoroughly before you execute it in Online mode. Since unsupported commands are skipped during measurement routine execution, in some cases this could cause a probe collision if you aren't careful.
Highlighted Text Shows the Active Command or Group
When you move your mouse over a command block, or command blocks that are grouped together, the entire command block, or the entire group, is highlighted with a slightly darker background color (see item C in the example above). This helps you immediately see the extents of an entire command block. Doing this also makes the command "active". This means you don't need to click on the command to operate on it. For example, you can hover your mouse over a command and press F9. The associated dialog box appears if one exists. To delete the command, you don't need to select the entire command, just hover your mouse over it until it becomes active, and press Delete. When editing large measurement routines, shaving off a mouse click here and there can increase your productivity.
"<" and ">" Characters Provide Enhanced Readability
The "<" and ">" characters group like values together, thereby more easily delineating the different fields for various X, Y, Z and I, J, K values. These characters show where these pairs begin and end. This enhances readability and makes it much easier to locate needed values.

Popup Menu Provides an Additional Toggle Field Selection
While you can cycle through a list of available commands on a toggle field, you can also hover your mouse over the darker blue text for a moment, and the background color takes on a button-like quality. Click on the button to show a drop-down list from which you can select the desired value for that toggle field.

Easier Filename Fields
Certain fields take filename values. If the file moves to a new location, there's an easier way to update it than arduously retyping a long directory pathway. Instead, hover your mouse over the field; the filename turns into a button. Click the button to display a File Open dialog box, which allows you to locate and update the file's location.