You can also access the Gage dialog box in these ways:
Click the Caliper button (
 )
from the QuickCloud toolbar.
)
from the QuickCloud toolbar.From the QuickMeasure toolbar, click the Gage drop-down arrow, and then click the Caliper button.
This option is only available if your PC-DMIS license includes the Small COP or Big COP option.
The Caliper is a quick-check tool that works similar to a physical caliper. It provides a local two-point size check on the Pointcloud (COP), Mesh, or COPOPER (such as the COPSELECT, COPCLEAN, or COPFILTER) object. The Caliper shows the measured length along the selected axis or direction.
Select the Caliper option from the Insert | Gage menu.
You can also access the Gage dialog box in these ways:
Click the Caliper
button ()
from the QuickCloud toolbar.
From the QuickMeasure toolbar, click the Gage drop-down arrow, and then click the Caliper button.
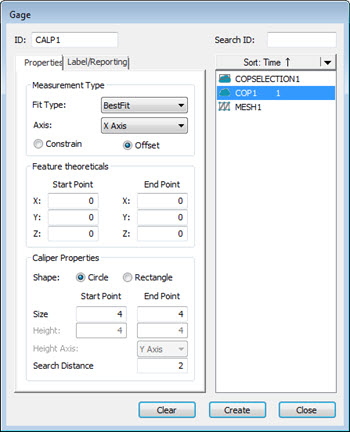
Gage dialog box
A caliper has two tips, which are used to measure the distance between two opposing sides. The caliper's tip has a user-defined size. Click in the Graphic Display window to select the start and end points. Using the data within the tip size, the caliper end points stop at the high points on the selected data (or optionally, on the calculated best fit points). The software performs a search distance along the caliper axis to determine the relevant points.
The Gage dialog box has these tabs:
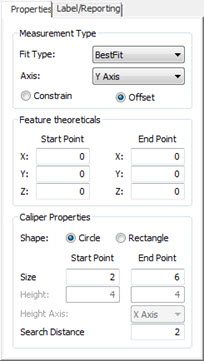
 Gage
dialog box - Properties tab
Gage
dialog box - Properties tab
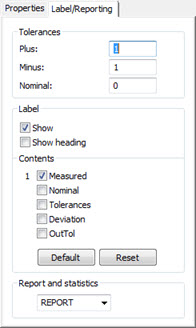
Gage
dialog box - Label/Reporting tabClear button: Click to reset the Gage dialog box to the auto settings configuration.
Create button: Click to create a new Caliper defined with the settings you made in the Gage dialog box. The software creates the Caliper.
Close button: Click to close the Gage dialog box without creating a Caliper.
Caliper line thickness
You can set the thickness of the Caliper line through the OpenGL tab of the CAD and Graphic Setup dialog box (Edit | Graphic Display Window | OpenGL). For details, see the topic "Changing OpenGL Options" in the "Setting Your Preferences" chapter of the PC-DMIS Core documentation.
More: