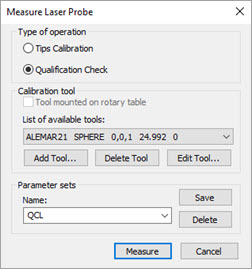
The options on the Measure Laser Probe dialog box determine the procedure that the software uses for the laser sensor calibration. To access this dialog box, open the Probe Utilities dialog box (Insert | Hardware Definition | Probe), and then click Measure.
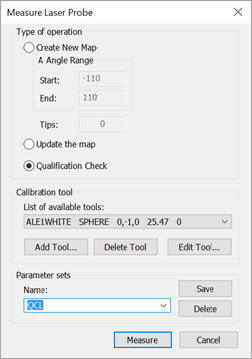
Measure Laser Probe dialog box for an indexable head (top) and the CW43L (bottom)
Change the options as needed or as directed in "Step 4: Calibrate the Laser Sensor".
Types of Calibration Operations
The options in this section are available based on the laser sensor. Tips works for all probes, and Offset is only for Perceptron sensors.
Tips Calibration - Use this option to calibrate the tips for your laser sensor.
Qualification Check - Use this option to re-measure the tip orientations that you specify within the selected probe file. PC-DMIS performs a comparison to the previously measured data for these tip orientations. You can then use this comparison to determine if a complete calibration is needed. This is an audit-only procedure within the selected probe file and does not update the tip offsets.
If you use a mapped CW43L continuous wrist, these options become available:
Create New Map - This option creates a new complete wrist map.
This is an operation that should be done when your machine was initially setup. It should only be re-done when service intervention occurs. Depending on your machine’s configuration and speed, this operation can take up to 8 hours to complete.
Update the Map - This option updates an existing map. You can this option when a probe crash occurs that does not need service operation support, or when you get larger than expected Qualification Check return errors.
Parameter sets
Parameter sets allow you to create, save, and use saved sets for your laser sensor. PC-DMIS saves this information with the probe file, which includes the settings for your laser sensor.
To create your own named parameter sets:
Modify any parameters on the Measure Laser Probe dialog box.
From the Parameter Sets area, in the Name box, type a name for the new parameter set, and click Save. To delete a saved parameter set, select it, and click Delete.
Calibration Tool
Select the appropriate calibration tool. If this is your first calibration, you need to click Add Tool to first define the calibration tool. For specific information on defining a qualification tool, see the "Defining Hardware" chapter of the PC-DMIS Core documentation.
Make sure you use the spherical qualification tool that comes with your laser sensor. The surface characteristics of this tool are designed for optimal scanning results. If you use a tool made by another manufacturer, it may produce inaccurate data.