UniScan is an automated way to create scan commands that cover selected faces while respecting the maximum incidence angle of the laser sensor. You can then use laser tips and eventually the machine volume.
PC-DMIS applies optimization algorithms at various steps of the scan process to ensure the most ideal results within a pre-defined computational time limit. The main optimization criteria used are:
Minimizing the number of tip changes
Defining the shortest total path for the laser scans
You can use the MaxOptimizationTimeMs entry to define the maximum time in milliseconds that the UniScan optimization algorithms take. For details, see the "MaxOptimizationTimeMs" topic in the PC-DMIS Settings Editor documentation.
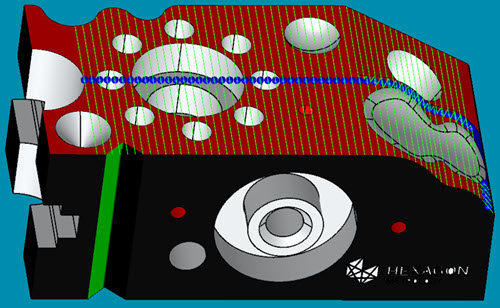
The UniScan performs the scan analysis based on the machine volume if you have an insert machine command in your measurement routine. If your part is located in such a way that some areas of the selected faces cannot be scanned due to machine volume limits, PC-DMIS notifies you. The software colors these areas black to inform you that they could not be scanned due to the part's position in the machine's volume.
Example of a UniScan with unable to scan areas shown in black
To perform a scan, follow these steps:
Open the UniScan dialog box (Insert | Scan | UniScan).
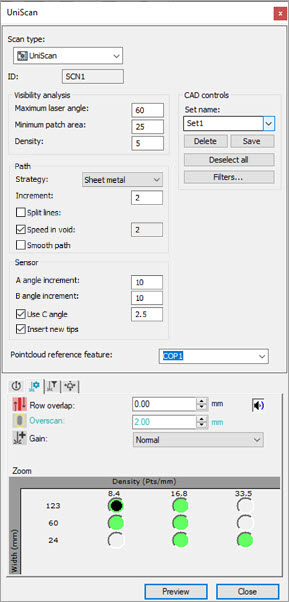
UniScan dialog box
Make the necessary changes to the scan properties. For details on the UniScan dialog box properties, see "Description of the UniScan Dialog Box".
Select the surfaces that you want to scan or select the set name from the Set name list in the dialog box.
Click the Preview button to perform a scan analysis on the selected surfaces. When PC-DMIS finishes the scan analysis, PC-DMIS displays a message about the scan details and prompts you to create the scan.
Click Yes to create the scan, or No to return to the dialog box. If you click Yes, PC-DMIS creates the scan command in the Edit window and the Graphic Display window shows the scan on the selected surfaces.
PC-DMIS generates the UniScan command into groups in the Edit window. Right-click the scan and select Expand Groups to display the entire command showing all grouped components of the command.
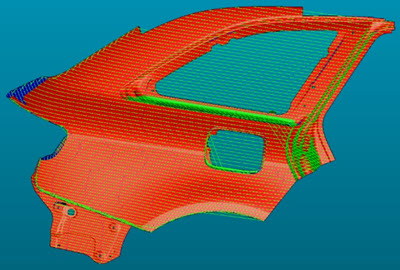
Example of the UniScan after scan analysis is completed but before scan is created
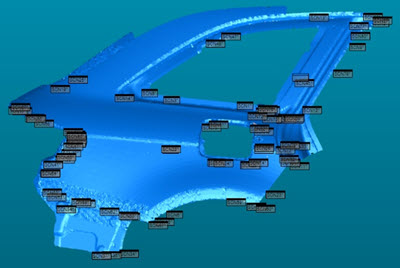
Example of the UniScan after the scan is created and executed
Example of a UniScan code snippet with groups collapsed:
UNISCN_COP1_60.0DEG_123.5WIDTH_2.0OSCAN_GRP1=GROUP/SHOWALLPARAMS=NO
ENDGROUP/ID=UNISCN_COP1_60.0DEG_123.5WIDTH_2.0OSCAN_GRP1
Example of the same UniScan code snippet with groups expanded:
UNISCN_COP1_60.0DEG_123.5WIDTH_2.0OSCAN_GRP1=GROUP/SHOWALLPARAMS=YES
TIP/T1A0B-90, SHANKIJK=0, 0, 1, ANGLE=-90
SCN1 =FEAT/SCAN,FREEFORM,NUMBER OF HITS=13,SHOW HITS=NO,SHOWALLPARAMS=NO,POINTCLOUDID=COP1
MEAS/SCAN
BASICSCAN/FREEFORM,NUMBER OF HITS=13,SHOW HITS=NO,SHOWALLPARAMS=NO
ENDSCAN
ENDMEAS/
ENDGROUP/ID=UNISCN_COP1_60.0DEG_123.5WIDTH_2.0OSCAN_GRP1
More: