Step 8 - Measure the Datum Sphere
You are now asked to complete a few steps for the ACR1 Probe Changer through the following message boxes:
Please jog to a clear location then click OK. If you have a moveable wrist it will then rotate to the A/B angles defined on the Mount Point tab.
Follow the instructions for this message and then click OK.
Please remove the shims and close all the probe changer lids. Then release the auto joint adapter and take 1 hit on the bottom of the auto joint with the probe changer datum sphere. Be careful to avoid the small pins and holes and take the hit on a flat area.
After you complete this point the auto joint diameter will be measured in DCC.
Follow the instructions for this message and then click OK.
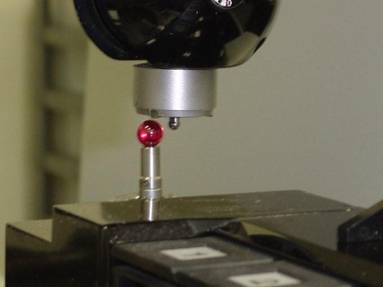
At this point, a message displays in the Machine commands list in the Execution dialog box. It instructs you to take a hit with the stylus on top of the datum sphere (inverted probe stylus) on the left end of the probe changer.
Follow the instructions in the dialog box, remove the probe, and then take one hit on the datum sphere.
When you have completed these steps, click OK to begin DCC measurement.
WARNING: When you do this, the machine moves. To avoid injury, stay clear of the machine. To avoid hardware damage, run the machine at a slower speed.
PC-DMIS automatically lowers the Autojoint extension to the side of the datum sphere. It then proceeds to take four hits in DCC mode on the outside diameter of the Autojoint extension.
In the next step, you measure the datum sphere with PEM extension(s).