Step 4 - Prepare for Calibration
To start the calibration process for the ACR3 Probe Changer:
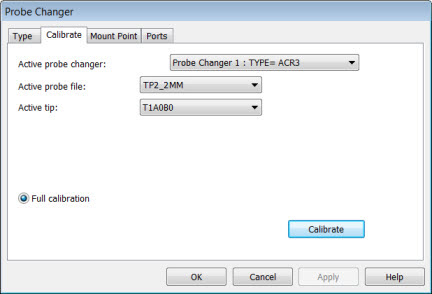
Select the Calibrate tab in the Probe Changer dialog box (Edit | Preferences | Probe Changer):
Probe Changer dialog box - Calibrate tab
In the Active probe changer list, select Probe Changer 1: TYPE=ACR3.
The entry in the Active probe file list defaults to the current measurement routine setting. If this is not what is to be used for the probe changer calibration, select the proper probe.
The entry in the Active tip list defaults to the current measurement routine setting. If this is not what is to be used for the probe changer calibration, select the tip ID to be used for calibration. This is usually T1A0B0.
Click Calibrate. The following message box appears:
Shim open the lids on all the ACR3 ports.
Remove any probes currently in any of the ports.
Insert the setting gauge into port 1.
Move the ACR3 to the unlocked position (left-hand side of travel).
Then click OK.
Read and follow the instructions from each prompt.
Hold the lids open by pushing them all the
way back and inserting a shim before and/or after each port.
A "shim" is a tapered piece of plastic that fits in between
two ports to hold their lids open. The picture below shows a close-up
view of shims between multiple adjacent ports, holding open their
lids:
![]()
Shims between multiple adjacent ports
Without a shim, the lids will shut.
With the lids open, remove all of the modules and styli by sliding them forward and out of the ports, as shown below:
![]()
ACR3 Probe Changer with empty ports held open with shims
When you are ready to take the first measurement, click OK.
In the next step, you take the first manual hit.