With the Auto Feature dialog box open, click once near but not on where the two surfaces meet. If you are in Surface mode, PC-DMIS generates the point on the angle of the two surfaces.
With the Auto Feature dialog box open, click once on the planar surface that contains the circle for a hole, on the feature's wall, or on a cylindrical end of a stud.
The edge closest to the mouse-click determines whether the circle feature is a hole or a stud. (See Note B.) However, due to how the CAD is sometimes defined, PC-DMIS cannot always determine this on its own.
If the circle has a length (depth) like a cylinder, then PC-DMIS uses the circle closest to where you clicked the mouse to define the center position.
PC-DMIS automatically fills in the dialog box and determines the circle's vector.
For details on how to create single-point circle features with PC-DMIS Portable, see "Creating Single-Point Circle Features" topic in the PC-DMIS Portable documentation.
With the Auto Feature dialog box open, click once on the planar surface that contains the cone's hole, on the feature's wall, or on a conical end of a cone.
The edge closest to the mouse-click determines whether the cone feature is an inner cone or an outer cone. (See Note B). However, due to how the CAD is sometimes defined, PC-DMIS cannot always determine this on its own.
The vector of the cone points away from its apex.
PC-DMIS automatically fills in the dialog box and determines the center point. Inner cones use the larger radius for the center point. Outer cones use the smaller radius. PC-DMIS does this to avoid shank collisions when measuring the cone.
With the Auto Feature dialog box open, click once on the planar surface that contains the cylinder, on the feature's wall, or on a cylindrical end of an outer cylinder.
The edge closest to the mouse-click determines whether the circle feature is a hole or a stud. (See Note B). However, due to how the CAD is sometimes defined, PC-DMIS cannot always determine this on its own.
PC-DMIS automatically fills in the dialog box and determines the cylinder's vector. It uses the center location of the cylinder end closest to where you mouse-clicked.
With the Auto Feature dialog box open, click once anywhere. PC-DMIS automatically fills in the dialog box.
If using surface mode, PC-DMIS generates the edge on the nearest edge where you clicked.
If you are in Wireframe mode, the software only selects the edge. PC-DMIS requires a second click to create the edge point on the wire.
Same as Round Slot.
With the Auto Feature dialog box open, click once close to the back edge of the notch. When you single-click to create a notch feature, the software always defines it as an inner notch. PC-DMIS automatically fills in the dialog box.
With the Auto Feature dialog box open, click once on a polygon feature that contains five or more sides. PC-DMIS automatically fills in the dialog box and determines the starting side by the edge closest to the mouse click.
With the Auto Feature dialog box open, click once near an edge that contains the corner point.
The closest edge to the mouse click determines the closest end point to the mouse click. This end point becomes the corner point.
PC-DMIS automatically fills in the dialog box.
How it Works:
PC-DMIS finds adjacent edges relative to the first edge. It tests each edge to see if it has an end point coincident to the corner point. If so, then it finds a point on that edge very near the corner point. This continues until two edges (and two points) are found that have unique vectors (ideally perpendicular) to each other and the first edge.
Once PC-DMIS has three points near the corner point, these three points are all on different edges. Using the two different points near the corner point, and the corner point, PC-DMIS computes three planes. For example, in this

 image,
the YELLOW corner point and the RED and WHITE points create
a plane whose vector is the BLUE arrow. Similarly, the
YELLOW, WHITE, and BLUE points give us the RED arrow and
the YELLOW, BLUE, and RED points give us the WHITE arrow.
image,
the YELLOW corner point and the RED and WHITE points create
a plane whose vector is the BLUE arrow. Similarly, the
YELLOW, WHITE, and BLUE points give us the RED arrow and
the YELLOW, BLUE, and RED points give us the WHITE arrow.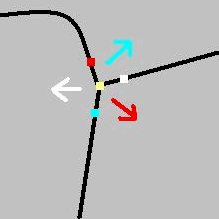
With the Auto Feature dialog box open, for an inner round slot, click once on the planar surface that contains the rounded edge or the feature's wall. For an outer round slot, click on the top edge of the rounded end, away from where the curve ends, and the planar sides begin or on the feature's wall. (See Note A).
The edge closest to the mouse click determines whether the feature is an inner round slot or an outer round slot. (See Note B). However, due to how the CAD is sometimes defined, PC-DMIS cannot always determine this on its own.
PC-DMIS automatically fills in the dialog box and determines the slot's vector and orientation.
With the Auto Feature dialog box open, for an inner square slot, click once on the planar surface near any edge of the slot or on the feature's wall. For an outer square slot, click on any top edge or on the feature's wall. (See Note A).
The edge closest to the mouse click determines whether the feature is an inner square slot or an outer square slot. (See Note B). However, due to how the CAD is sometimes defined, PC-DMIS cannot always determine this on its own.
PC-DMIS automatically fills in the dialog box and determines the slot's vector and orientation.
With the Auto Feature dialog box open, click once on the sphere's edge. PC-DMIS automatically fills in the dialog box.
With the Auto Feature dialog box open, click once anywhere. PC-DMIS automatically fills in the dialog box.
With the Auto Feature dialog box open, click once anywhere. PC-DMIS automatically fills in the dialog box.
If you use Curve mode, PC-DMIS snaps the point to the nearest wire.
If you use Surface mode, PC-DMIS generates the point where you clicked.