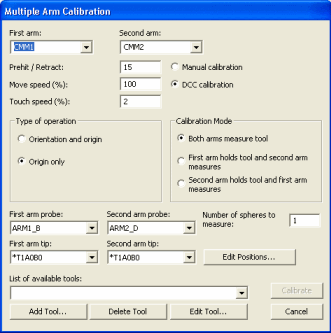

Multiple Arm Calibration dialog box
Select the Operation | Calibrate/Edit | Multiple Arm Mode menu option (only available in Online mode). This displays the Multiple Arm Calibration dialog box.
Ensure that the correct probe files and tips are selected from the arm lists in the dialog box.
Ensure that the calibration tool you are using is available from the List of available tools list. The tool is only needed if you selected the Both arms measure tool option.
Define the Prehit / Retract, Move speed, and Touch speed values as desired. During calibration, these values supersede the same values listed in the Measure Probe dialog box (Insert | Hardware Definition | Probe | Measure button). In addition, they are shared by both arms to ensure that they operate using the same conditions during calibration:
Prehit / Retract - This defines a distance value away from the part or calibration tool. The speed of PC-DMIS decreases to the defined Touch speed while within this distance. It remains at the Touch speed until the hit is taken and the distance is reached again. At that point, PC-DMIS returns to the defined Move speed.
Move speed - This defines the speed that PC-DMIS uses to move the probe into position to take hits during multiple arm calibration.
Touch speed - This defines the speed that PC-DMIS uses to take hits during multiple arm calibration.
Depending on the state of the Display absolute speeds check box on the Part/Machine tab in the Setup Options dialog box (Edit | Preferences | Setup), the above Move speed and Touch speed boxes can either accept an absolute speed (mm/sec) or a percentage of the machine's defined top speed.
Choose what you want to calibrate by selecting either the Orientation and origin option or the Origin only option.
Selecting the Orientation and origin option creates a 3D transformation between the two arms to compensate for any out-of-squareness between the two arms. You must do this at least once (normally, this is done periodically every few months).
Selecting Origin only corrects only the origin between the two arms. You should do this type of calibration more frequently, based on probe calibration procedures. When calibrating your probe, PC-DMIS asks if you moved your tool. If you normally indicate to PC-DMIS that you haven't moved the tool, then you don't have to adjust your arm-to-arm origin. If you answer that you have moved the tool, then after calibrating your probe tips, you should return to this dialog box and choose the Origin only type of arm-to-arm calibration.
With Origin only, make sure you are using calibrated tips.
Choose how you want to perform the calibration by selecting either Manual calibration or DCC calibration.
If you selected the Manual calibration option, PC-DMIS prompts you to measure each sphere position using the CMM 's jog box. Once you have taken the first hit on the top of the sphere, PC-DMIS takes the rest of hits in DCC mode.
If you selected the DCC calibration option, you are prompted to supply the sphere positions. Once entered, the computer performs the calibration's motion control.
WARNING: When you do this, the machine moves. To avoid injury, stay clear of the machine. To avoid hardware damage, run the machine at a slower speed.
Click the Edit Positions button to change the location of each sphere position by typing the X, Y, and Z coordinates. You may find it helpful to read the position of the active arm to fill in these three values. Be aware that clicking the Done button on your jog box can read the arm's current position.
You must first do at least one origin arm-to-arm calibration in Manual mode to establish the basic relationship between the two arms. When you complete an arm-to-arm calibration, PC-DMIS generates an armarm.results file stored in the directory defined through the Set Search Path menu option (see the "Specifying Search Paths" topic in the "Setting your Preferences" chapter). This text file is viewable using any text editor. It shows how beneficial the spheres are once you have done the initial fit. In particular, it displays the "fitment error". This information may help to show the overall accuracy of the calibration..
Type a number in the Number of spheres to measure box. This value determines the number of spheres PC-DMIS measures for each arm. If you type a number of spheres greater than 1, PC-DMIS averages the measurements to create the origin.
If you use the Manual calibration option, PC-DMIS prompts you to manually measure these positions.
If you use the DCC calibration option, PC-DMIS automatically drives each arm to measure these positions. The minimum number of spheres is three.
Ensure that the spheres aren't in the same position. Otherwise, the calibration finishes with incorrect results.
Use the available options below to determine how PC-DMIS uses the arms to measure the tools.
Both arms measure tool
If you select this option and you use Manual calibration, PC-DMIS prompts you to measure each sphere position with both arms.
If you select this option and you use DCC calibration, PC-DMIS drives both arms to measure a sphere at each of the positions defined in the Edit Calibration Positions dialog box. Be sure to have the desired number of sphere positions actually present on the CMM since there is not enough time to physically move the sphere around between measurements.
First arm holds tool and second arm measures
If you select this option and you use Manual calibration, PC-DMIS prompts you to move Arm1 to each position and then measure the spherical tool with Arm2.
If you select this option and you use DCC calibration, PC-DMIS moves Arm1 to each of the given calibration positions and then command Arm2 to measure the sphere at that position. For this option, you need a special sphere mounted onto the end of the arm.
Second arm holds tool and first arm measures
If you select this option while using Manual calibration, PC-DMIS prompts you to move Arm2 to each position and then measure the spherical tool with Arm1.
If you select this option while using DCC calibration, PC-DMIS moves Arm2 to each of the given calibration positions and then command Arm1 to measure the sphere at that position. For this option, you need a special sphere mounted into the end of the arm.
Click Calibrate once this button becomes enabled. It remains disabled until you select all needed calibration parameters.
If you select Both arms measure tool, you must provide the following items before the Calibrate button becomes available:
A valid Arm1 probe file name and tip angle.
A valid Arm2 probe file name and tip angle.
A valid tool specified in the list of available tools.
If you select First arm holds tool and second arm measures, you must provide the following items before the Calibrate button becomes available:
A valid Arm1 probe file name and tip angle.
A valid Arm2 probe file name and tip angle.
The Arm1 tip type must be of type FIXEDBALL as specified in the probe.dat.
If you select Second arm holds tool and first arm measures, you must provide the following items before the Calibrate button becomes available:
A valid Arm1 probe file name and tip angle.
A valid Arm2 probe file name and tip angle.
The Arm2 tip type must be of type FIXEDBALL as specified in the probe.dat.
Once you click this button, PC-DMIS begins the requested calibration. This creates an alignment between Arm1 and Arm2 by leveling, rotating, and setting the origin.
If you selected the Manual calibration option, you must begin by taking one point on the top of the tool. PC-DMIS automatically measures the rest of the points. Once you have measured the tool in the current position, PC-DMIS prompts you to move it to a new location on the table.
If you selected the DCC calibration option, PC-DMIS measures each of the given calibration sphere positions. Make sure the tool locations on the table are not co-linear (in a line). Position the tool locations as far as possible from each other, with at least one of the positions being raised up in the Z axis.
An alternate way to calibrate DCC machines involves performing a Manual Origin only calibration followed by a DCC Orientation and origin calibration. This method is useful on larger machines where it is reasonable to assume that the X and Z axes are relatively parallel. This would then be followed with probe calibration and then an Origin only calibration.