Using Step 13 as a guide, do the following:
Add in the preliminary commands (TEMPCOMP, MOVE/SYNC, and LOADPROBE commands).
In this case, you'll need a LOADPROBE commands for all probes (short, medium, and long extensions).
Press F9 and ensure Use wrist map if available is marked for each. Click Add Angles.
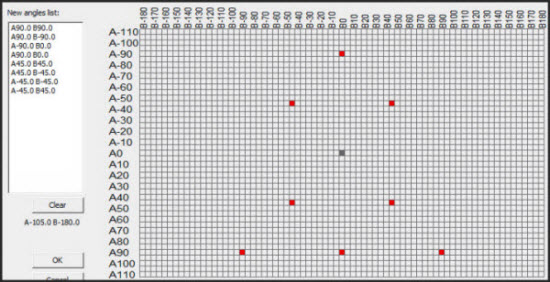
Use the Add New Angles box for each probe, and add in at least 9 angles in for the desired probe. These angles are recommended as they results in a sufficiently precise distribution: [0,0] [90,90] [90,-90] [-90,0] [-90,0] [45,45] [45,-45] [-45,-45] [-45,45]
Example Add New Angle dialog box showing the suggested angles
For increased precision, you can increase the angles to 17,
but this lengthens the execution time of the update.
The recommended 17 angles for this wrist are:
([0,0] [90,0] [90,-45] [90,-90] [90,-135] [90,45] [90,90] [90,135] [-90,0]
[45,-20] [45,-65] [45,-110] [45,-155] [45,25] [45,70] [45,115] [45,160])
Access the Measure Probe dialog box and define parameter sets for each probe. Ensure that DCC + DCC and Calibrate tips are selected.
Name each parameter set by basing it off the probe name and adding on an "_UPDATE" suffix. For example, ARM1_1 would have a parameter set named ARM1_1_UPDATE.
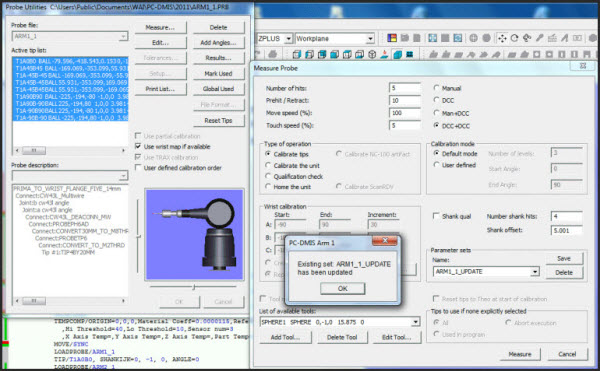
Example of Parameter Set creation
After each set of LOADPROBE commands, insert two AUTOCALIBRATE commands that correspond to the parameter sets for those loaded probes.
Insert a MOVE/SYNC command after each AUTOCALIBRATE pair.
Between each AUTOCALIRBRATE pair, after the MOVE/SYNC command, insert some safety move commands to prevent against possible crashes when the arms move to swap probes in and out of the probe changer.
At this point your routine should be organized like this:
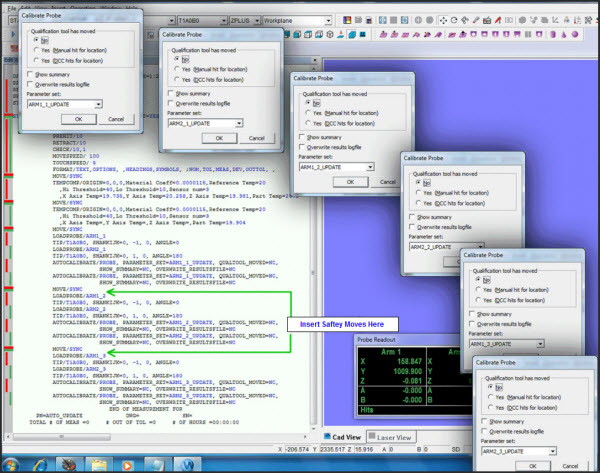
Sample AUTO_UPDATE.PRG Routine
Continue by adding these commands:
Go to the end of the routine, add in a LOADPROBE command for ARM1_1 and for ARM2_1.
Insert an AUTOCALIBRATE/MULTIPLEARM command and press F9. The AutoCalibrate Multiple Arms dialog box appears.
For First arm, choose CMM1. For Second arm, choose CMM2.
Choose Both arms measure tool.
Choose DCC calibration.
Choose SPHERE3 from the Available Tools list.
This last piece causes the short extension on both arms to go and measure SPHERE3 in order to adjust the relationship one last time between arm 1 and arm 2. Generally, you only need to use this final command after perhaps a month machine usage (or after many measurements) to occasionally adjust the offset and improve accuracy.
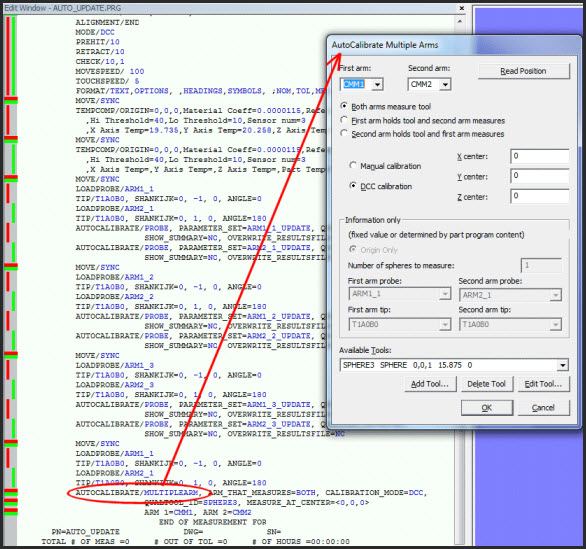
Example AutoCalibrate Multiple Arms dialog
Before running this final portion of the routine, be sure to place calibration spheres (SPHERE1, SPHERE2, and SPHERE3) back on the table.
Notes on using AUTO_UPDATE.PRG
You would run this measurement routine to update the mapping for a specific tip in these instances:
Whenever you want to adjust the accuracy of the machine.
Whenever you want to adjust a tip or need to add a new tip.
This routine is used more frequently than AUTO_MAPS.PRG.
A typical AUTOCALIBRATE command with update parameters and 1 extension can be done using the Execute Block command.
Running the entire measurement routine for all probe extensions and using the recommended nine angles takes about 30 minutes.