Since the two arms use different orientations, you need to properly configure the setup parameters to reflect this.
Set Up the Primary Computer
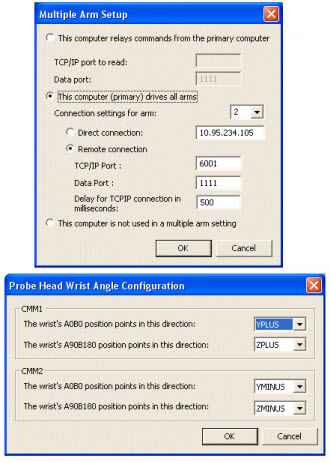
On your primary computer, modify the Multiple Arm Setup dialog box with these options:
To access this dialog box, select Edit | Preferences | Multiple Arm Setup.
Mark the This computer (primary) drives all arms option.
Choose 2 from the Connection settings for arm list.
Choose Remote connection. Set the connection values to the secondary machine: TCP/IP Port, Data Port, and Delay for TCPIP connection in milliseconds.
Click OK to close the Multiple Arm Setup dialog box.
Also, modify the Probe Head Wrist Angle Configuration dialog box with these options:
To access this dialog box, select Edit | Preferences | Setup, the Part/Machine tab, and then the Probe Head Orientation button.
In the CMM1 area, set the wrist's A0B0 position to point in YPLUS direction. Set the A90B180 position to point in ZPLUS.
In the CMM2 area, set the wrist's A0B0 position to point in the YMINUS direction. Set the A90B180 position to point in ZMINUS.
Click OK to close the Probe Head Wrist Angle Configuration dialog box.
Click OK to close the Setup Options dialog box.
Dialog boxes showing the settings used
Set Up the Secondary Computer
On the secondary computer, modify the Multiple Arm Setup dialog box, and click the This computer relays commands from the primary computer option.
Modify the Axis tab of the Machine Options dialog box (Edit | Preferences | Machine Interface Setup) with these options:
Set the X list to -X
Set the Y list to -Y
Set the Z list to Z
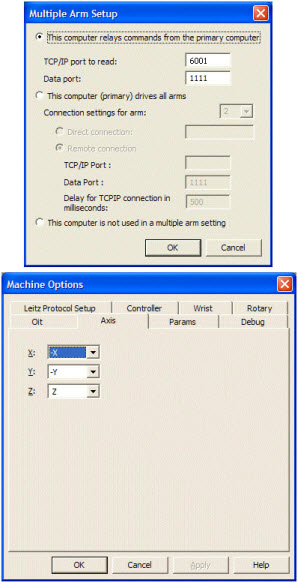
Dialog boxes showing the settings used
The angles are now set up as shown here:
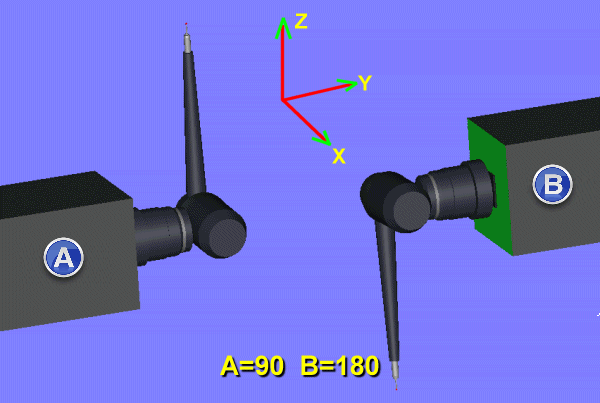
(A) - Arm1 (B) - Arm2
Angles with DEA Wrists
If you're using a machine with DEA wrists, use the PC-DMIS Settings Editor to modify these entries on both computers to the following values:
DEAWrist = 1
RotateWristFromController = TRUE
FlipBAxis = TRUE
AaxisMax = 181
AaxisMin = -181
The AaxisMax and AaxisMin entries define the allowed amount of angular rotation for the wrists. For very long extensions, you should not exceed +/- 124 degrees.
On the primary LEITZ computer (arm 1), set these entries:
AxisX = 0
AxisY = 2
AxisZ = 4
On the secondary LEITZ computer (arm 2), set these entries:
AxisX = 1
AxisY = 3
AxisZ = 4
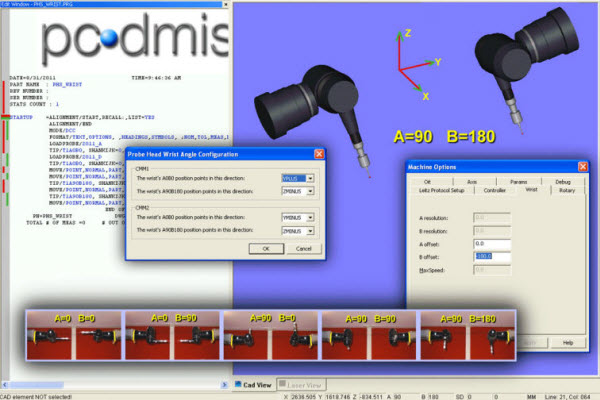
Note on Different Configurations
If you need to configure your machine differently from a conventional DEA machine; for example, if you want to use the wrist convention used in the PHS Renishaw, you would need to set the following parameters. They are then stored in the JSON file:
In the Machine Options dialog box for arm 1 (computer 1), set the B offset value to -180.
In the Probe Head Wrist Angle Configuration dialog box, specify the proper axes associated with the wrist rotations.
The figure below shows the values you should change along with some sample wrist rotations at the noted angles:
The next step provides information on backing up your files.