
The two modes for a three-button configuration are discussed below:
Measure Mode
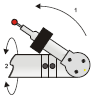
The following Measure Mode functions are available for the buttons indicated above:
1: DONE - To complete your measurements, press this button for less than one second.
1: ERASE - To erase the last hit, press and hold this button for longer than one second.
1: OPEN DRO - If there is no hit in the buffer, press and hold this button for longer than one second.
1: TOGGLE DRO - With the Readouts window (DRO) already open, press button 1 for less than one second. PC-DMIS shows the T value with the XYZ values in the DRO: XYZT
2: HIT POINT - To take a hit, press this button for less than one second.
2: PULLED HIT - To take a Pulled Hit, press this button, pull back the probe, and then release the button within one second. For details on how to take a Pulled Hit, see "Using Pulled Hits for Probe Compensation".
2: SCAN - To scan your part, press and hold this button for longer than one second. While the button is held, drag your probe over your part to begin the scan.
3: TOGGLE - To toggle between modes, press this button for less than one second.
Mouse Mode
The following Mouse Mode functions are available for the buttons indicated above:
1: PAN - Press and hold to pan the CAD model.
2: Mouse LEFT Button - Used for screen selections.
1+ 2:BOX ZOOM - Press and hold.
3: TOGGLE Between Modes - Press for less than 1 second.
3: ROTATE - Press and hold to rotate the CAD model.
Optional Methods for Switching Between Mouse Mode and Measure Mode
To switch to Mouse Mode: Press and hold the Take Hit button and then quickly press the Done button (within the first second).
To switch to Measure Mode: Move the cursor to the top of the screen and press the middle button (left mouse button).
To toggle from either mode:
Turn the "F" axis to the limit, then
Turn the "E" axis 90 degrees.