![]()
Tracker Operation toolbar (for AT-901 Trackers)
![]()
Tracker Operation toolbar (for AT930/960, AT-40x, AT500 and ATS600 Trackers)
![]()
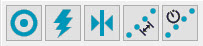
Tracker Operation toolbar (for LAS, LAS-XL and T-Scan Trackers)
Common Items
![]() Insert Tracker
Command - Determines whether or not PC-DMIS inserts a command into
the Edit window when you select to perform a Tracker operation from the
Tracker menu or Tracker Operations
toolbar.
Insert Tracker
Command - Determines whether or not PC-DMIS inserts a command into
the Edit window when you select to perform a Tracker operation from the
Tracker menu or Tracker Operations
toolbar.
If you enable this menu item, a check mark appears next to it. You can also toggle this on or off through the Insert a tracker command icon on the Tracker Operations toolbar.
![]() Station Management
- Brings up the tracker Station Manager dialog
box.
Station Management
- Brings up the tracker Station Manager dialog
box.
For details, see "Adding and Removing Stations".
![]() Initialize
- Initializes encoders and internal components of the laser tracker. This
command is automatically called when PC-DMIS first connects to the Laser
Tracker (emScon) controller once the tracker is warmed up. The tracker
goes through a series of movements to verify the functionality.
Initialize
- Initializes encoders and internal components of the laser tracker. This
command is automatically called when PC-DMIS first connects to the Laser
Tracker (emScon) controller once the tracker is warmed up. The tracker
goes through a series of movements to verify the functionality.
![]() Go 6DoF 0 Position
(Alt + F9) - The Leica Tracker points the laser in the opposite
direction of the BirdBath position to the 6DoF 0 position. This provides
a known and convenient location at which you can recapture the beam with
the T-Probe.
Go 6DoF 0 Position
(Alt + F9) - The Leica Tracker points the laser in the opposite
direction of the BirdBath position to the 6DoF 0 position. This provides
a known and convenient location at which you can recapture the beam with
the T-Probe.
![]() Find (Alt +
F6) - Searches for a reflector or T-Probe at the current laser
position. The find function is performed based upon the Search
Settings provided in the "Sensor
Configuration tab".
Find (Alt +
F6) - Searches for a reflector or T-Probe at the current laser
position. The find function is performed based upon the Search
Settings provided in the "Sensor
Configuration tab".
![]() Probe Compensation
On/Off (Alt + F2) - When the probe compensation is "ON",
PC-DMIS compensates by the radius of the T-Probe tip or the reflector
sphere. During bundle alignment creation, PC-DMIS automatically activates
or deactivates probe compensation as needed when it measures points.
Probe Compensation
On/Off (Alt + F2) - When the probe compensation is "ON",
PC-DMIS compensates by the radius of the T-Probe tip or the reflector
sphere. During bundle alignment creation, PC-DMIS automatically activates
or deactivates probe compensation as needed when it measures points.
![]() Stable Probing
On/Off (Alt + F7) - When this option is "on", PC-DMIS
automatically triggers a hit if you leave a reflector in a position for
a specified time. This is set from the Probing
tab on the Parameter Settings dialog box (F10).
It is only available if you are running as a tracker. This allows for
hits to be taken, without using a remote control or interacting directly
with the computer.
Stable Probing
On/Off (Alt + F7) - When this option is "on", PC-DMIS
automatically triggers a hit if you leave a reflector in a position for
a specified time. This is set from the Probing
tab on the Parameter Settings dialog box (F10).
It is only available if you are running as a tracker. This allows for
hits to be taken, without using a remote control or interacting directly
with the computer.
![]() Enable PowerLock
On/Off - Turns the PowerLock functionality on or off. When turned
on, the tracker's laser beam can very quickly re-lock on the device. This
means you don't need to catch the beam manually. If you break the laser
beam, point the reflector or other supported T-product measuring device
at the tracker, and the tracker immediately catches the beam for you.
This is usually helpful while you are relatively close to the tracker.
If you are working far away from the tracker, you may want to turn off
PowerLock because the field of view is so large that the laser always
locks on even if that isn't what you want. In addition, multiple reflectors
in the field of view could confuse the tracker and cause problems. This
icon is disabled for trackers that do not support the PowerLock functionality.
Enable PowerLock
On/Off - Turns the PowerLock functionality on or off. When turned
on, the tracker's laser beam can very quickly re-lock on the device. This
means you don't need to catch the beam manually. If you break the laser
beam, point the reflector or other supported T-product measuring device
at the tracker, and the tracker immediately catches the beam for you.
This is usually helpful while you are relatively close to the tracker.
If you are working far away from the tracker, you may want to turn off
PowerLock because the field of view is so large that the laser always
locks on even if that isn't what you want. In addition, multiple reflectors
in the field of view could confuse the tracker and cause problems. This
icon is disabled for trackers that do not support the PowerLock functionality.
![]() Tracker Overview Camera - Allows you to move the
tracker head and find reflective targets.
Tracker Overview Camera - Allows you to move the
tracker head and find reflective targets.
![]() Move Feature
- Displays the Move Feature dialog box. This
dialog box contains the Move To and Point
To options.
Move Feature
- Displays the Move Feature dialog box. This
dialog box contains the Move To and Point
To options.
For details, see "Move Feature (Move To / Point To)".
For details, see "Using Bundle Alignments".
 Specific
Items (for AT-901 Trackers)
Specific
Items (for AT-901 Trackers)
Specific
Items (for AT-901, LAS, LAS-XL and T-Scan Trackers)
Specific
Items (for AT-930/960, AT-40x, AT500, ATS600, LAS, LAS-XL and T-Scan Trackers)