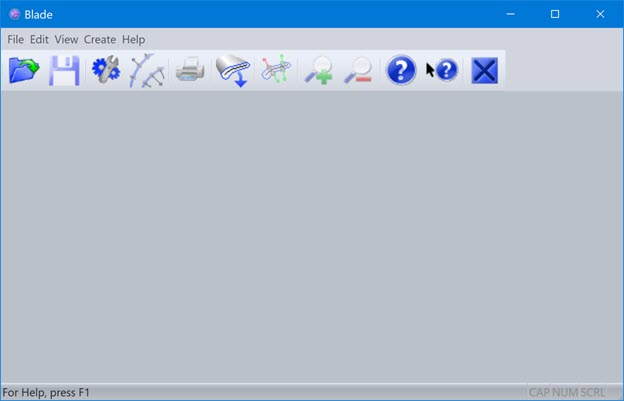
When you open the Blade Analysis software, the screen looks like this:
Blade User Interface
File - This menu options lets you open a Blade Report file for data analysis or to select a language.
Edit - This menu options lets you edit support files which are required for analysis of airfoil sections.
View - This menu option allows you to turn the toolbar or status bar On or Off.
Create - This menu options lets you create new support files which are required for analysis of airfoil sections.
Help - This menu option lets you open the offline help, online help, and release notes.
Status bar - This bar displays messages from the software.
The buttons on the Standard toolbar are shown below:

Standard Toolbar
Open (File | Open) - Enables you to open a Report file for analysis. For more information, see "Open a Report File".
Save Calculations (Action | Save Calculations) - Exports the analysis data to DataPage and the output files that are available in OFFLINE mode. For more information, see "Saving Calculations".
Set Preferences (Edit | Preferences) - Enables you to specify how to create and display analysis reports and plots. For more information, see "Editing Blade Preferences".
Plot Parameters (Plot | Change Plot Parameters) - Changes the parameters of the plot (available only for the New profile plot menu option). For more information, see "Creating Profile Plots".
Print (File | Print) - Prints the current window.
Create Math File (Create | Math File) - Enables you to create a Math file from a Nominal file. For more information, see "Math File".
Profile Plot (Plot | Create New Profile Plot) - Creates a new profile plot from the analyzed Report file. For more information, see "Creating Profile Plots".
Zoom In (+) (Zoom | Zoom In +) - Zooms in on the active window.
Zoom Out (-) (Zoom | Zoom Out -) - Zooms out on the active window.
About (Help | About Blade) - Opens the About PC-DMIS Blade window, which shows the current PC-DMIS Blade version.
Help (Shift+F1) (Help | Help Topics) - Opens the PC-DMIS Blade online Help.
Exit (File | Exit) - Exits PC-DMIS Blade.
Shortcuts
Keyboard and Mouse Shortcuts
Alt + F4: Closes PC-DMIS Blade.
Ctrl + O: Opens the Open dialog box.
Ctrl + P: Opens the Print dialog box.
Ctrl + Tab: Advances to the next window in the report.
F1: Displays the PC-DMIS Blade help system's main page.
Shift + F1: Displays a help cursor. Click on an item to display the main PC-DMIS Blade help page.
Mouse scroll wheel: Pans vertically in a window.
Profile Plot Shortcuts
Right mouse button drag: Pans during plot view.
Left mouse button drag: Creates a zoom box during plot view.
Ctrl + R: Resets View (Clear annotations and Scale to Fit).
Ctrl + Z: Restores Zoom (Scale to Fit).
Ctrl + Right-click: Displays nominal point numbering (works only when a nominal curve displays).
Enlarging the Entire Part Image within a Window
To enlarge (or zoom in on) the entire image of a part:
Move the pointer to a point above the imaginary, horizontal centerline of the graphic part display.
Right-click.
The farther away the cursor is from the centerline, the more the drawing enlarges.
Shrinking the Entire Part Image within a Window
To shrink (or zoom out of) the entire image of a part:
Move the pointer to a point below the imaginary, horizontal centerline of the graphic part display.
Right-click.
The farther away the cursor is from the centerline, the more the drawing shrinks.
Enlarging a Portion of a Part Image within a Window
To enlarge (or zoom in on) a specified section of a part:
Place the pointer at a corner of the selection area.
Drag the left mouse button, or both the right and left mouse buttons simultaneously, over a portion of the window.
When the box contains the proper geometry, release both mouse buttons to have PC-DMIS Blade zoom in on the selected area.
Once you reach a certain point, the image doesn't enlarge any further.