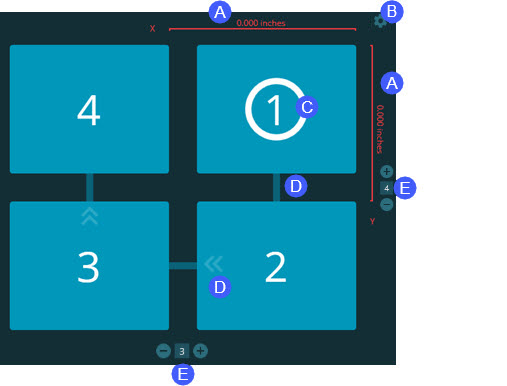
The Pallet Layout tab lets you define your pallet. This tab appears if you choose Pallet from the Playlist Type list.
The Pallet Layout tab contains these elements:

Part Offsets - These lines show the distance from the origin of one part to another in the grid. They are always near the starting cell. The red color remains until you define a non-zero value. The "Inches" or "mm" text comes from the Measurement Units value in the software's General settings. For more information on the measurement units, see "The Settings Screen".
Pallet Layout Settings
- This gear button ( ) opens up various pallet
layout settings so that you can define the alignment type, choose
an external alignment file, set the starting offset, or change the
pallet axes. For more information on these settings, see "Pallet Layout Settings".
Not all pallet settings are contained here. Some pallet settings are
also in the Settings tab of the playlist
dialog box. For information, see "The
Playlist Dialog Box".
Start Position - The corner cell with the number one in a circle indicates the pallet's start position. To set a new position, hover your mouse pointer over a corner cell (top right, bottom right, bottom left, or top left), and click the white dot.
Direction Indicators - The blue bars between cells and the chevron arrows indicate the execution direction. To change the execution direction, hover your mouse pointer over the same start position cell and click again on the white dot.
Column and Row Values - These numbers indicate how many columns and rows are in the pallet grid. You can type new values, or you can click the + or - buttons to modify the number of columns and rows.
Once you configure the pallet layout and save your changes, you can execute the pallet. For information, see "Executing a Pallet Playlist".