There are two methods to perform an Area Scan:
Performing an Area Scan from the Area Scan dialog box
Use the settings on the Area Scan dialog to open the overview camera and define the scan region and settings. The software stores the region and settings you select so you can re-execute the scan. You have the option of storing the data in a scan (points) or in a pointcloud (COP).
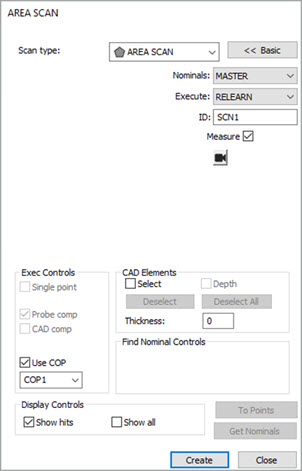
Area Scan dialog box
To create the Area Scan command and perform an Area Scan from the Area Scan dialog box:
Select the Surface probe.
Select an Area Scan Measurement Profile from the Tracker Operation toolbar (Insert | Toolbars | Tracker Operation).
 - Area
Standard
- Area
Standard
 - Area
Fast
- Area
Fast
 - Area
Precise
- Area
Precise
Select Insert | Scan | Area Scan to open the Area Scan dialog box.
Click the Overview Camera button and define the scan region and settings. When done, click the "X" in the upper-right of the Overview Camera window to close it.
Click Use COP to store the scanned data into a pointcloud, and then select a COP from the ID list or enter a new COP ID if one does not exist.
Select the Measure check box if you want to begin measurements immediately after closing the dialog box.
Click Create to add the Area Scan command into the Edit window, and then click Close to return to the PC-DMIS main screen.
Performing an Area Scan from the QuickStart window
To perform an Area scan with the ATS600 Tracker from the QuickStart window:
Select the Surface probe in PC-DMIS.
Select the Area Scan Measurement Profile from the Tracker Operation toolbar (View | Toolbars | Tracker Operation).
Click the Tracker Overview
Camera button ![]() from the Tracker Operation toolbar.
from the Tracker Operation toolbar.
Select Add Region and click the surfaces you want to scan. Right-click to end the selection.
Click to define the Reference Distance.
Click a second time to define the Point 2 Point Distance.
Click a third time to define the Line 2 Line Distance.
PC-DMIS updates the Overview Camera window to show the selected settings. The Overview Camera window shows the time (T) needed to complete the scan.
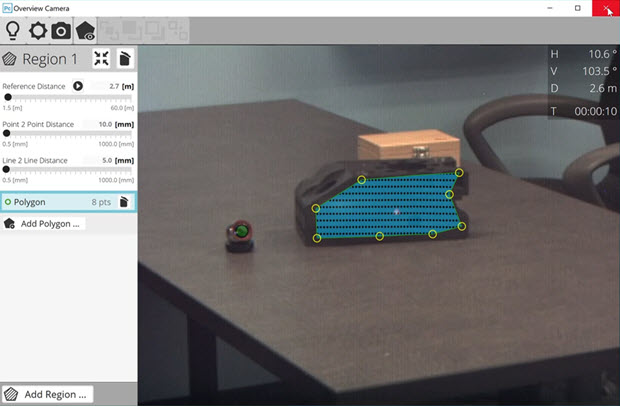
Example of the Overview Camera window
Click the X in the upper-right of the screen to close the Overview Camera window.
You can measure the scan in either of these ways:
In "Learn" mode, where PC-DMIS automatically determines the feature type. Click Start/Stop Continuous mode (Ctrl+I) on the Tracker Measure toolbar (View | Toolbars | Tracker Measure) to start the scan.
Select the scan feature from the QuickStart window, and then click Start/Stop Continuous mode (Ctrl+I) on the Tracker Measure toolbar.

Example of the QuickStart window, select the Scan feature
More: