There are different ways to insert an existing laser scan profile. Any pointcloud (COP) that occurs in your measurement routine after the profile command uses those profile settings during a scan.
Inserting a Laser Scan Profile from the Dialog Box
You can use this method for PC-DMIS configured for Portable or CMM.
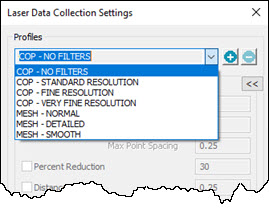
Click the Pointcloud Data Collection Parameters button from the Pointcloud toolbar to open the Laser Data Collection Settings dialog box.
Select the profile from the Profiles list.
Click the Insert Profile button. PC-DMIS inserts the profile command below the current cursor position in the Edit window.
Inserting a Laser Scan Profile from the Edit Window when you are in Command mode
You can use this method for PC-DMIS configured for Portable or CMM.
Place the Edit window in Command mode (View | Command Mode).
Add a new line in the Edit window where you want to insert the profile command.
Type the LASERPROFILE command and then select the profile from the list.
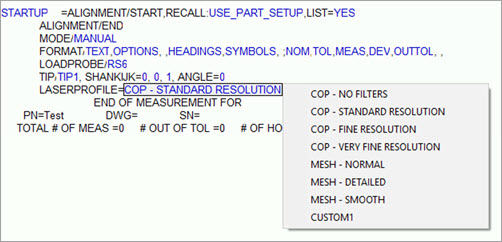
Hover over the command until it's highlighted and then click to view a list of profiles. Select an item from the list to change the profile.
Changing a Laser Scan Profile Command
You can change the profile of an existing profile command in the Edit window or from the Laser Data Collection Settings dialog box. To do this:
In the Edit window, click the profile command you want to change.
Open the Laser Data Collection Settings dialog box and select the new profile from the Profiles list. Or, in Command mode, hover over the current profile ID and select an item from the list.
Click OK. The profile command in the Edit window updates to the new profile.
For CMM users only, if the measurement routine already contains a laser profile command, and your cursor is below that command in the Edit window, the following scenario applies:
You open the Laser Data Collection Settings dialog box.
You select a different profile and, instead of clicking the Insert Profile button you click OK.
PC-DMIS does not use the profile you selected. Instead, it reverts to the previously inserted profile.
When a profile already exists but your cursor is not on an existing profile in the Edit window

PC-DMIS automatically displays the Portable
Scanning Widget toolbar in the Graphic Display window when you
connect to a portable device and the active probe is a laser scanner.
When you connect to a portable device, and your active probe is a laser
scanner, you can use the Portable Scanning Widget
button  to show and hide the Portable
Scanning Widget toolbar. You can find the Portable
Scanning Widget button on the Pointcloud,
QuickCloud and Mesh
toolbars (View | Toolbars).
to show and hide the Portable
Scanning Widget toolbar. You can find the Portable
Scanning Widget button on the Pointcloud,
QuickCloud and Mesh
toolbars (View | Toolbars).
For Portable only, PC-DMIS automatically inserts a new profile command if the cursor is not on a Profile command in the Edit window and there's another Profile command above where the cursor is at in the Edit window.
If these conditions are met, you can select a profile from the Portable Scanning Widget to insert it.
Inserting a Laser Scan Profile from the Portable Scanning Widget
You can only use this method with PC-DMIS configured for Portable.
If your cursor is on a profile in the Edit window, you can change it from the Portable Scanning Widget. To do this, place your cursor on an existing profile in the Edit window and select a new profile from the widget's profile list.
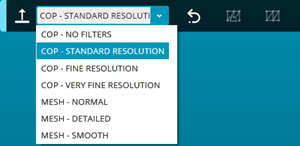
The profile command automatically updates to the new profile in the Edit window.
More: