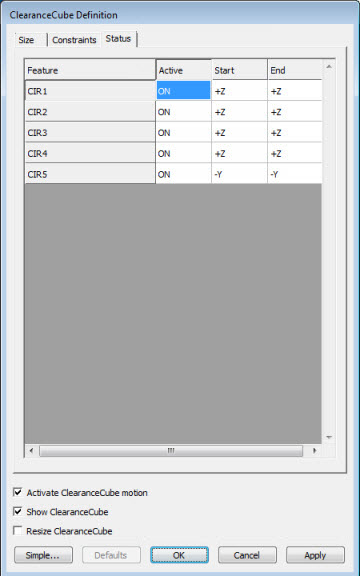
Use the Status tab on the advanced-style ClearanceCube Definition dialog box (Operation | Graphic Display Window | ClearanceCube) to quickly see and edit what features use the ClearanceCube motion and what features don't.

ClearanceCube Definition dialog box - Status tab
List of Features - This list contains these four columns:
Feature - This column lists each feature in the measurement routine.
Active - This column determines whether or not ClearanceCube motion is used for each feature. If it is set to ON, the ClearanceCube motion is used for that feature. If it is set to OFF, ClearanceCube motion is not used.
Start - If Active is set to ON, this determines the ClearanceCube face to move to before the feature is measured. You can also set a specific Start cell to OFF if you only want the ending motion to occur for the feature.
End - If Active is set to ON, this determines the ClearanceCube face to move to after the feature is measured. You can also set a specific End cell to OFF if you only want the starting motion to occur for the feature.
You can easily change the values in the Active, Start, and End values by directly typing the value into the appropriate cell, or you can right-click and select it from the resulting shortcut menu.
Activate ClearanceCube motion - This is already described in the "(Simple) ClearanceCube Definition" topic.
Show ClearanceCube - This is already described in the "(Simple) ClearanceCube Definition" topic.
Resize ClearanceCube - This is already described in the "(Simple) ClearanceCube Definition" topic.
Simple - This button sets the dialog box back to its initial simplified state.
The ClearanceCube Shortcut Menu
In addition to using this tab, if you right-click on a feature inside the Edit window, a ClearanceCube shortcut sub menu is available within the resulting shortcut menu that lets you enable or disable ClearanceCube motion for specific features or choose specific offset faces to use. For information, see the "Command Mode Shortcut Menu" topic in the "Using Shortcut Keys and Shortcut Menus" chapter.
An Example of ClearanceCube Motion
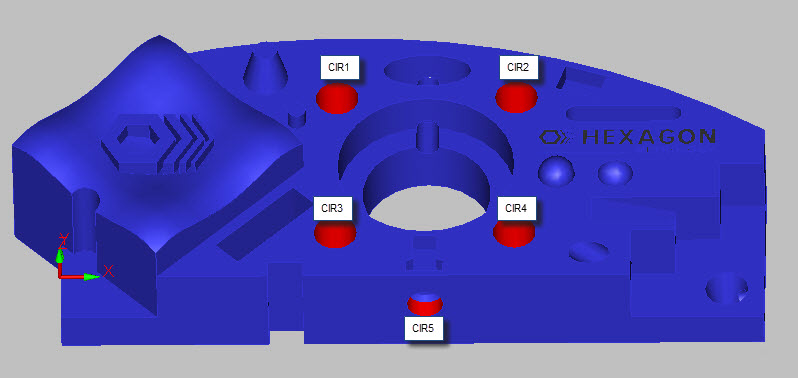
Suppose you want to measure these five holes as circle features. Notice that the first four circles reside on the Z+ face, and that CIR5 is on the Y- face:

If you turned on ClearanceCube motion before creating any of the circles, the Status tab after the circles were created would look like this:
Feature |
Active |
Start |
End |
CIR1 |
ON |
+Z |
+Z |
CIR2 |
ON |
+Z |
+Z |
CIR3 |
ON |
+Z |
+Z |
CIR4 |
ON |
+Z |
+Z |
CIR5 |
ON |
-Y |
-Y |
This means at the start and end of each feature, the probe motion would jump up to the Z+ ClearanceCube offset for features CIR1 through CIR4 and then before measuring CIR5, the probe motion would move to the Y- offset.
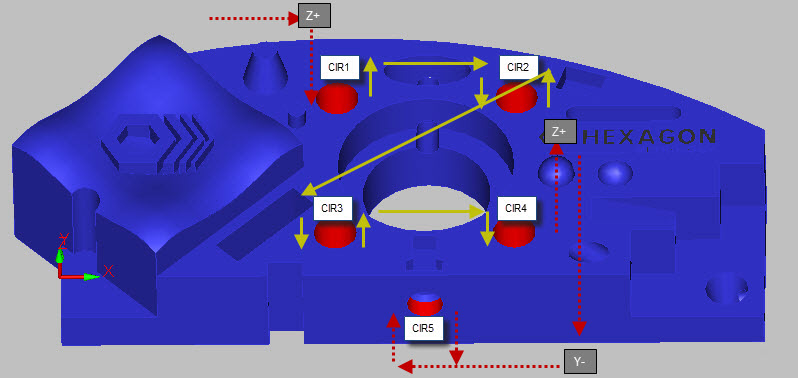
However, for CIR1, through CIR4, having the probe jump up to the Z+ offset distance before and after each measurement would result in a some wasted motion if the offset were set too high. Now, suppose you only wanted to move to the Z+ distance before CIR1 and after CIR4 and use shorter MOVE/POINT commands between each of those circles. You could easily turn off the ClearanceCube motion for all or part of those feature measurements within the Status tab, by setting the list to look like this.
Feature |
Active |
Start |
End |
CIR1 |
ON |
+Z |
OFF |
CIR2 |
OFF |
+Z |
+Z |
CIR3 |
OFF |
+Z |
+Z |
CIR4 |
ON |
OFF |
+Z |
CIR5 |
ON |
-Y |
-Y |
Therefore, ClearanceCube motion would be performed before the CIR1 feature is measured and again after the CIR4 feature is measured as shown in this diagram where the dotted red lines indicate the ClearanceCube motion and the yellow solid lines indicate the MOVE/POINT commands being used between CIR1 and CIR4.
