The K-field configuration file specifies the K-fields that the user's organization selects to send to the Q-DAS ASCII Transfer Format file. You can specify the K-fields that are used, the values that are allowed for them, and from where these values will be obtained.
You can find the configuration file in this folder:
C:\Users\Public\Documents\Hexagon\PC-DMIS\2022.1\Q-DAS\Settings
The file name is:
<name>.qdascfg.xml
Where <name> is the name you gave the file when you saved it.
You can also set up predefined K-field values. For details, see "Setting Up Predefined Values".
For the K-fields that PC-DMIS supports, see "Supported K-Fields".
To create the K-field configuration file, follow these steps:
To open the Q-DAS Configurator application, select the Operation | Q-DAS | Open Configurator menu option.
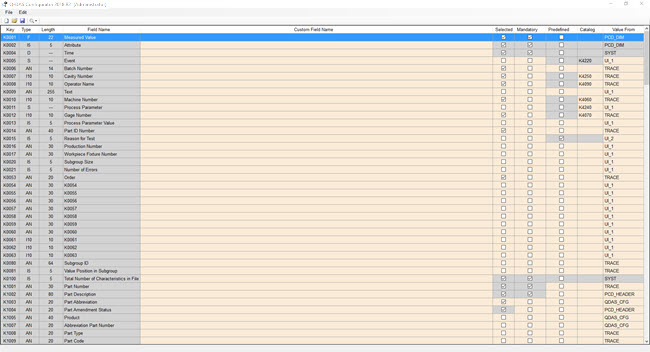
From Q-DAS Configurator, select Setup | K-Field Configuration to open the Setup K-Field Configuration dialog box. PC-DMIS opens the current K-field configuration file and displays all of the supported K-fields in a table format.
To open any other K-field configuration file, from the Setup K-Field Configuration dialog box, select File | Open.
PC-DMIS displays the message to update the K-field configuration file if any new K-fields are available for selection.
Click Yes to update the file.
Click No if you want to use the file with the previous version.
Setup K-Field Configuration dialog box
To save multiple K-field configurations on your computer, you can use either the File menu or the toolbar buttons in the dialog box.
You can also create and load K-field configurations.
You can use the Find and Replace option on the Edit menu to quickly find and replace values that can be modified.
You can edit columns that are a light-brown color. You can change the values of some drop-down lists in these areas. To do this, click on a value to select it, and then click on the value again to display the cell's drop-down arrow. You cannot edit anything with a gray background.
For descriptions of the columns, see "Columns and Descriptions".
To identify a K-field with a custom name, type the name in the Custom Field Name column.
To enable a K-field so that it appears in the Q-DAS Configurator application, select the check box in the Status column.
To ensure that a field has a value, select
the check box in the Mandatory column. In
the Q-DAS Configurator
application, any mandatory field that needs a value displays an exclamation
point  .
.
To provide a K-field with a list of predefined values, select the check box in the Predefined column. In a later step, these K-fields appear in the Setup Predefined Values dialog box, where you can define the list of values available for each K-field.
To assign a K-field to a Q-DAS catalog, select the K-field's row. The selected row is highlighted in blue. Click the drop-down arrow in the Catalog column, and then select the catalog to use.
The Value From column defines where a K-field's value comes from. Select the K-field's row. The selected row is highlighted in blue. Click the drop-down arrow in the Value From column and then select where the value comes from.
To save the configuration file, select File | Save As to open the Save As dialog box. In the File name box, type a name.
To return to the Q-DAS Configurator application, select File | Exit.
More: