Box-Select Shortcut Menu
This shortcut menu only works in Text
Box Mode.
To access this menu, follow these steps:
From the Graphic
Modes toolbar, select the Text Box Mode
icon ( ). (For information
on this mode, see "Text
Box Mode" in the "Editing
the CAD Display" chapter.)
). (For information
on this mode, see "Text
Box Mode" in the "Editing
the CAD Display" chapter.)
Box-select one or more features
to select all graphical features or feature ID labels inside the box.
A shortcut with these options appears:
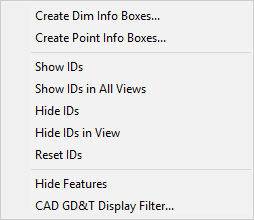
The following options are available:
Create
Dim Info Boxes
This menu option creates Dimension Info text boxes from the selected features.
PC-DMIS displays the Edit Dimension Info dialog box for one of the
highlighted features. The dialog box shows the available dimensions from
which you can create the first Dimension Info box.
Once you select the desired
options in the Edit Dimension Info dialog box,
click either the OK or Create
button (Apply button when editing) to create
the Dim Info boxes.
PC-DMIS creates the first
Dim Info box from any selected dimensions in the Edit
Dimension Info dialog box.
PC-DMIS then creates subsequent
info boxes from all dimensions associated with each feature.
If no dimensions are associated
with any of the features, PC-DMIS creates a default Location dimension
for that feature (see "Dimensioning
Location" in the "Using
Legacy Dimensions" chapter). For information on how to use the
Edit Dimension Info dialog box, see "Inserting
Dimension Info Boxes" in the "Inserting
Report Commands" chapter.
Create
Point Info Boxes
Select this menu option to create Point Info text boxes from the highlighted
features. PC-DMIS displays the Edit Point Info
dialog box for one of the highlighted features. This dialog box shows
the feature (and any available dimensions ) from which you can create
the Point Info text box.
Once you’ve selected the
desired options in the Edit Point Info dialog
box, select the OK or Create
button (Apply button when editing) to create
the info boxes.
PC-DMIS creates the first
info box from the selected feature or dimension (or dimensions) in the
Edit Point Info dialog box. PC-DMIS creates
the subsequent Point Info boxes from all dimensions associated with each
feature and the feature itself. A Point Info box is created for all dimension
and feature hits. For information on how to use the Edit
Point Info dialog box to create a Point Info text box, see "Inserting
Point Info Boxes" in the "Inserting
Report Commands" chapter.
Show
IDs, Hide Ids
Select one of these menu options to show or hide all the selected features'
ID labels. If you choose to hide the ID labels, the ID labels still exist
and are merely hidden from view.
Show
IDs in All Views
This option shows all the selected ID labels in all of the available Graphic
Display window view panes.
Hide
IDs in View
This option hides all the selected ID labels in the current Graphic Display
window view pane.
Reset
Ids
This option moves all selected ID labels back to their original locations
next to their respective features.
Hide
Features
This option hides all selected features on a part, removing them from the
Graphic Display window. The features still exist and are merely hidden
from view.
CAD GD&T
Display Filter
This menu option displays a dialog box allowing you to filter what CAD
GD&T callouts are displayed. It appears in the shortcut menu if your
CAD model contains embedded CAD GD&T information. See "Working
with CAD GD&T Callouts" in the "Editing
the CAD Display" chapter.