Apply COLORMAP to a CAD model with Multiple Surface Profile Tolerances
There are two methods to apply a Surface Colormap when
the CAD model has multiple surface-profile tolerances.
Method 1
Create multiple Surface Colormaps, one for each tolerance
or Surface Profile.
To create multiple Surface Colormaps, do the following:
From the Pointcloud
toolbar, select the Pointcloud Surface Colormap
button ( ). The Pointcloud
Operator dialog box for the Surface Colormap appears.
). The Pointcloud
Operator dialog box for the Surface Colormap appears.
Enter the tolerances.
Select the specific CAD surfaces. For details
on selecting CAD surfaces, see "Working
with CAD Surfaces" in the "Scanning
Your Part" chapter in the PC-DMIS Core documentation.
Click Apply to apply
the Surface Colormap to the selected CAD surface.
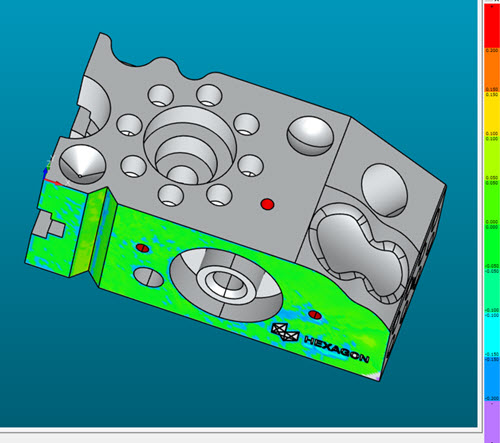
Example of the Surface Colormap
applied to the first-selected CAD surfaces
Click Create to add
the Surface Colormap in the Edit window.
Create a second Surface Colormap in the same
manner for the next Surface Profile.
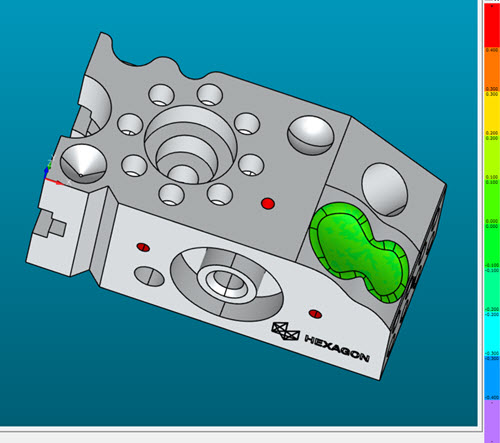
Example of the second Surface
Colormap applied to the selected CAD surfaces
Method
2
You can create groups of selected CAD surfaces within
a single colormap. Each group can have different tolerances and Surface
Colormap parameters (Refine factor, Max distance, and Thickness). If the
Surface Colormap has two or more groups, the software displays the color
scale with percentages.
In this example, the left image shows three different
grouped CAD surfaces. The image on the right shows surface color maps
applied to each group, using the percentage of tolerances:
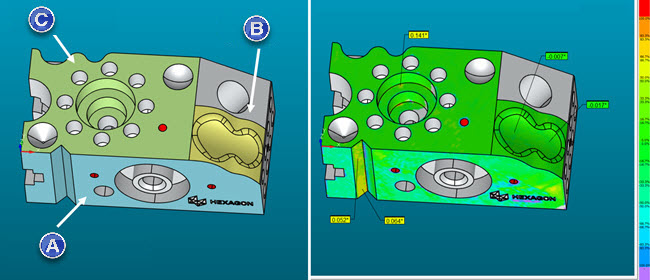
(A) - Group01 TOL +/-0.1mm
(B) - Group02 TOL +/-0.2mm
(C) - Group03 TOL +/-0.3mm
To create groups and apply different tolerances to
the selected CAD surfaces within one colormap, do the following:
From the Pointcloud
toolbar, select the Pointcloud Surface Colormap
button (). The Pointcloud
Operator dialog box for the Surface Colormap appears.
Enter the tolerance values and colormap parameters
(Refine factor, Max distance,
and other parameters).
From the Pointcloud Operator
dialog box, select the Select check box
in the CAD Controls area.
Click each of the CAD surfaces to be grouped.
PC-DMIS highlights the surfaces with the group color as you click
them. Click the Deselect button to remove
the last highlighted surface from the group.
To group the selected (highlighted) surfaces,
click the Add a new data group (+)
button located to the right of the Group
list.
This group remains the active
group until you create a new group. PC-DMIS applies any changes that you
make to the tolerances or COLORMAP parameters to the active group. Also,
if you select additional surfaces, PC-DMIS adds them to the active group.
To identify which surface
belongs to which group, PC-DMIS highlights the selected CAD surfaces with
the group color. To identify which group a grouped surface belongs to,
press and hold the Shift key and then left-click the surface. The Group list updates to show the group to which
it's assigned.
If you click a CAD surface
that is not in the active group, PC-DMIS removes it from the group it
is currently assigned to, and then adds it to the active group.
To create another group, click the Add
a new data group (+) button again,
click the surfaces on the CAD, and update the tolerances and any COLORMAP
parameters as necessary. Repeat to create more groups.
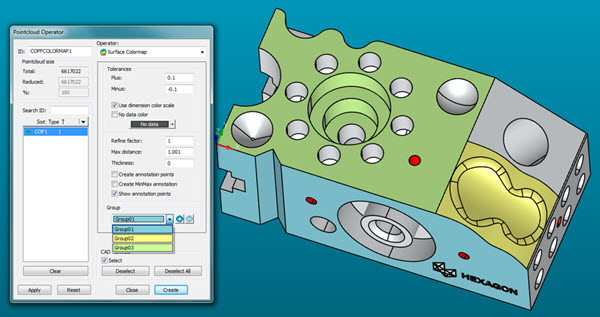
Example of grouped CAD surfaces
To make changes to a group, select it from
the Group list and make the necessary changes.
To delete a group, select it from the Group list and click the Remove
the current data group (-) button.
When a COLORMAP contains two
or more groups with different tolerances, the color scale is automatically
set to show the deviations with percentages.
Dimensioning Surface Profile using Pointcloud Colormap
with Groups
You can use Pointcloud COLORMAP Groups to dimension
Surface Profiles if you have the Use Legacy Dimensions
option (Insert | Dimension) active. PC-DMIS
does not currently support any other dimensioning method.
Create the Pointcloud COLORMAP Groups as described
in Method 2.
For legacy dimensions, do this:
Click the Profile
Surface Dimension option from the Dimension
toolbar (View | Toolbars | Dimension). The software
displays the Surface Profile dialog box for
legacy dimensions:
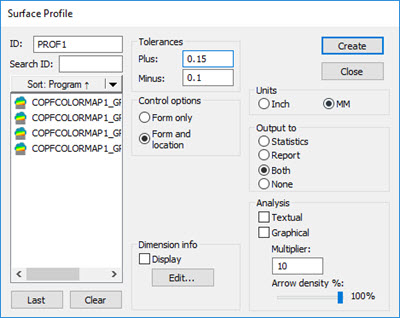
Surface Profile legacy dialog
box for pointcloud colormap with groups
Related
Topics:
Dimensioning
Surface Profile Using the Mesh COLORMAP
More:
SURFACE
COLORMAP
Dimensioning
Surface Profile Using the Pointcloud Surface COLORMAP