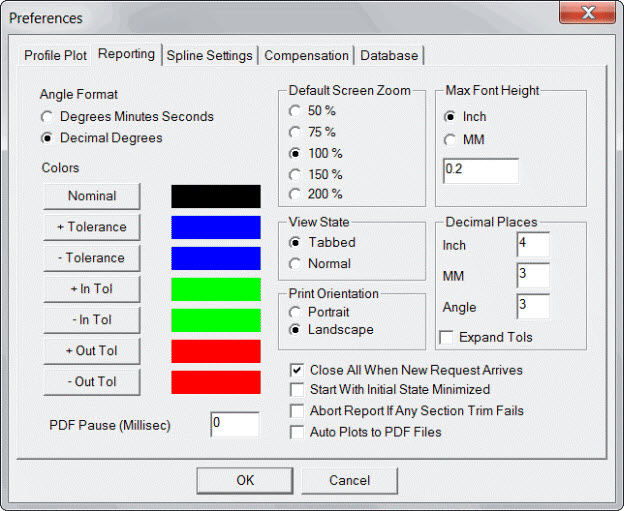
Use the Reporting tab to specify the colors and screen behavior for viewing reports.

Preferences dialog box - Reporting tab
Angle Format Area
Specify how angles display:
Degrees Minutes Seconds option - Degrees minutes seconds
Decimal Degrees option - Decimal degrees
Colors Area
Use the buttons in this area to specify the colors for each value type. To specify a color, click the Nominal, + Tolerance, - Tolerance, + In Tol, - In Tol, + Out Tol, or - Out Tol button. Then select a color in the Color dialog box to specify the colors that indicate each value’s state of being in tolerance.
Default Screen Zoom Area
Select the percentage of zoom to apply to each view when you first open it.
View State Area
Select the type of view:
Tabbed option - Organizes the views as a set of tabs.
Normal option - Creates new documents as a set of cascading views.
Print Orientation Area
Select the default orientation for reports:
Portrait option - Displays reports vertically.
Landscape option - Displays reports horizontally.
Max Font Height Area
This value defines the largest font size to use when you print reports. The corresponding height (as a percentage) is used when the report generates on the screen. The report's text is no larger than the inch or mm value that you enter in the box.
Decimal Places Area
The values in this area display with the corresponding number of decimal places that you enter in the Inch, MM, and Angle boxes.
Expand Tols check box - Expands tolerances by half of the decimal place beyond the last one shown. For example, if the tolerances of a calculation are -0.01 and +0.01, and the number of decimal places is 3, then PC-DMIS Blade actually uses tolerances of -0.0105 and +0.0105. This avoids cases where the deviation would be shown as being the same as a tolerance, but flagging it as out of tolerance.
Other
Close All When New Request Arrives check box - This setting applies only to PC-DMIS Blade when you run it online (invoked by the measurement routine). The question is what to do when Blade is already running and a set of analysis documents is open from a previous execution. If you select this check box, the analysis windows close before the new analysis starts. If you clear this check box, open windows remain open.
Start With Initial State Minimized check box - If you select this check box, PC-DMIS Blade initially starts up as an icon in the task bar. This can be useful when running online. You may only want to view the printed output.
Abort Report If Any Section Trim Fails check box - The first step that PC-DMIS Blade performs in the analysis of a blade is to trim the ends of the scans. Sometimes this step fails. If you select this check box, PC-DMIS Blade stops the analysis if a section trim fails, and no analysis is done. If you clear this check box, the analysis continues and PC-DMIS Blade skips the failed sections.
Auto Plots to PDF Files check box - If you select this check box, PC-DMIS Blade automatically generates plots as PDF-formatted documents.
PDF Pause (Millisec) - The amount of time (in milliseconds) to pause between printing multiple PDF pages.
More: