Two shortcut menus are available to access commonly used commands and options:
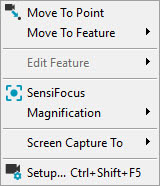
Live View Menu
To access the Live View shortcut menu, access the Vision tab, and then right click anywhere in the Vision tab, but not on a target.
Move To Point: When you select this option, the view moves to center the Live View image to the location where you right-clicked.
Move To Feature: Selecting one of the nearest ten features from this submenu moves the center of the Live View image to the center of the selected feature.
Edit Feature: Selecting one of the nearest ten features from this submenu will open the Auto Feature dialog box so that you can edit the properties for the selected feature. See "The Auto Feature Dialog Box in PC-DMIS Vision".
The features listed under the Move To Feature and Edit Feature submenus are listed in increasing order of distance.
SensiFocus: This performs an automatic SensiFocus at the Live View position you right-clicked to access the shortcut menu. See the "SensiFocus" button discussed in the "Live View Controls" topic.
Magnification: This submenu gives another way to affect the magnification of the camera's view of the part. This submenu contains menu options that function just like the shortcut keys discussed in "Changing the Magnification of the Part Image".
Screen Capture To: This submenu lets you save a screen capture of the Vision tab to a file, the Clipboard, or to a PC-DMIS report. The currently selected view (CAD tab or Vision tab) is captured.
Setup: This menu option accesses the Live Image Setup dialog box. See "Setting Up the Live View".
Live View Target Menu
To access the Live View Target menu, right-click on a target in the Vision tab.
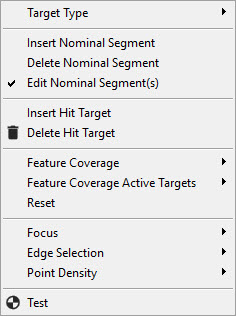
Target Type: Right-click on a target and change the target type from one of the following: Automatic Target, Manual Target, Gage Target, and Optical Comparator. For detailed information on each target type, see "Probe Toolbox: Hit Targets tab".
Insert Nominal Segment: To add a segment, right-click at the needed location and select the Insert Nominal Segment menu option. This will add a handle to the target that you can drag to match the geometry of the target. For example, there may be a V notch on a straight edge that you need to add to the target.
Delete Nominal Segment: To delete a segment, right-click on the handle and select the Delete Nominal Segment menu option. This will remove the selected handle. This simplifies the nominal form of a target by removing detail.
Inserting and deleting nominal segments is only used for Profile 2D Features. These options allow you to add or remove segments to a Profile 2D shape in order to match the feature more accurately.
Insert Hit Target: To insert a new Hit Target, right-click at the needed location and select the Insert Hit Target menu option. This is unlike the Insert Hit Target button from the Probe Toolbox that randomly inserts a new Hit Target.
Delete Hit Target: To delete a Hit Target, right-click the needed target and select the Delete Hit Target menu option.
Feature Coverage: This menu item allows you to quickly change the coverage for a feature. New targets will be created or removed based on the selected percentage of coverage. For information, see "Hit Target Controls".
Feature Coverage Active Targets: This menu item determines the number of targets to use to display the selected coverage percentage in the Target Feature Coverage list. For information, see "Hit Target Controls".
Reset: To reset the target areas of a feature, right-click on a target of the needed feature and select the Reset menu option. This will delete the entire previously added target, leaving the single default target.
Focus: This on/off toggle allows for focus prior to target measurement. Each target section has the ability to do a focus prior to doing the edge detection. This is the same as the option found in the "Probe Toolbox: Focus tab".
Edge Selection: Right-click on a target and change the target edge selection method from one of the following: Automatic Target, Manual Target, Gage Target, and Optical Comparator. For detailed information, see "Probe Toolbox: Hit Targets tab".
Point Density: To change the target Point Density right-click on a target and select the needed menu option from the Point Density submenu. For more information on the available Point Density options, see "Edge Parameter Set".
Test: To test a feature, right-click on a feature and select the Test menu option. For more information on testing features, see the "Vision Controls - Command Buttons" topic.