
Linear Closed Scan dialog box
The Insert | Scan | Linear Closed method scans the surface beginning at the designated STARTING point and completes the scan at the same point. This type of scan is a closed scan because it returns to its initial starting point. This is useful for scanning circular features or slots.
This procedure requires that the starting point location and direction point be defined. You supply the incremental value for taking hits.
PC-DMIS scans the surface as defined below.
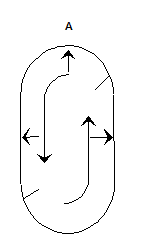
A - Starting point and ending point

A sample Linear Close Scan with scan points inside a hole
To Create a Linear Closed Scan
Ensure that you have a TTP or an analog probe enabled.
Place PC-DMIS into DCC mode.
Select Insert | Scan | Linear Closed from the submenu. The Linear Closed Scan dialog box appears.
Type the name of the scan in the ID box if you want to use a custom name.
Select the appropriate LINEARCLOSE type from the Direction 1 Tech list.
Depending on your type of LINEARCLOSE scan, type the appropriate increment and angle values into the Max Incr, Min Incr, Max Angle, and Min Angle boxes.
If your scan traverses multiple surfaces, consider selecting surfaces by using the Select check box as discussed in the "Graphics Tab" topic.
Add the 1 point (starting point) and the D point (direction to scan in) by following an appropriate procedure as discussed in the "Boundary Points area" topic.
Select the appropriate type of hits to take from the Hit Type list in the Hit Controls area.
Make any needed changes to the vectors in the Initial Vectors area. To do this, double-click on the vector, make any changes to the Edit Scan Item dialog box, and then click OK to return to the Linear Closed Scan dialog box.
Select the appropriate nominals mode from the Nominals list in the Nominals Method area.
In the Tolerance box in the Nominals Method area, type a tolerance value that at least compensates for the probe's radius.
Select the appropriate execution mode from the Execute list in the Exec Controls area.
If you are using a thin part, type the part's thickness in the Thickness box on the Graphics tab.
If needed, select any of the check boxes from the areas on the Execution tab.
If you are using an analog probe, consider using the Control Points tab to run your scan optimally.
Click the Generate button in the Theoretical Path area on the Path Definitions tab to generate a preview of the scan on the CAD model in the Graphic Display window. When you generate the scan, PC-DMIS starts the scan at the start point, and follows the chosen direction around the feature until it returns to the start point.
If needed, you can delete individual points. To do this, select them one at a time from the Theoretical Path area and press the Delete key.
If desired, use the Spline Path area in the same tab to fit the theoretical path to a spline path.
Make additional modifications to your scan as needed.
Click the Create button. PC-DMIS inserts the scan into the Edit window.
To Create a Linear Closed Scan on a 3D Wireframe CAD Model
To perform a Linear Closed scan on a wireframe model, you should generally use a 3D wireframe CAD file. You need the 3D wires to define the shape of the feature you want to scan, as well as its "depth" (3D aspect). This type of scan follows the same procedure as above.
To Create a Linear Closed Scan on a 2D Wireframe CAD Model
If you absolutely must perform a Linear Closed scan on a 2D wireframe file, you can do so with some extra work.
Import the 2D CAD file. The CAD origin needs to be on the CAD some place and not off in body coordinates (this just makes things easier).
Select Insert | Feature | Construct | Line. The Construct Line dialog box appears.
Choose Alignment. This will construct a line at the CAD origin and normal to the surface of the 2D CAD data.
Access the Edit window and, if using millimeters for your units of measurement, change the length of the line from 1 (the default) to something longer, such as 5 or 10. For measurement routines that use inches, ignore this step.
Export the measurement routine (the features only) to either an IGES or DXF file type. Store the exported file to a directory of your choice.
Return to your measurement routine. Delete the alignment line that you created.
Import the file that you just exported back into the same measurement routine. When prompted, click Merge to merge the CAD wire into your Graphic Display window. Your CAD model should now have a CAD wire normal to the rest of the other CAD wires.
Access the Linear Open Closed dialog box.
Click on the Graphics tab and then select the Select check box.
Click each wire that defines the feature to be scanned. Select them in the order that they will be scanned, starting with the wire where the scan will start.
Select the Depth check box.
Click on the imported wire that is normal to all the other wires.
Clear the Select check box. You can now select your 1 (start point) and D (direction) on the theoretical surface defined by the wires that define the surface's shape and the wire defining the depth.
If PC-DMIS is in Online mode, select the Measure check box. Select FindNoms from the Nominals Method area. In the Tolerance box, select a good tolerance value.
Click Create. PC-DMIS inserts the scan. If it is in Online mode, it begins the scan and finds the nominals.