How To Calibrate a Rotary Head Axis
Instructions | |||||
|---|---|---|---|---|---|
1 | Press the Wrist Head Calibration button. |
| |||
2 | Press the Set Wrist Calibration Angles button to add the wrist angle positions to be calibrated. |
| |||
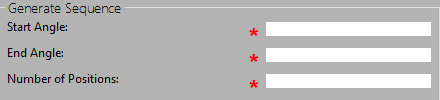
3 | Type the start and end angles and how many positions you want to measure.
| ||||
4 | Once you type the angles and the number of positions, press the Generate Position List button. |
| |||
5 | Press the Clear Position List button to delete the position list if needed. |
| |||
6 |
| Press OK to save the position list. | |||
7 | Move the machine to a safe position for rotating the head between positions and then press the Set Safe Move Height button. |
| |||
8 |
| Position the probe for automatic measurements and then press the Execute button. Start the monitor macro on the machine. NC Gage starts the calibration process at the start angle with the defined number of points and positions to the end angle. | |||
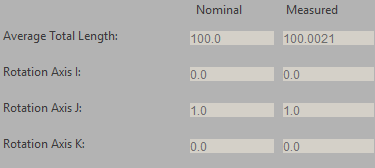
9 |
| Review the calibration data and press OK.
| |||


Additional Notes
You must use a minimum of three positions to perform the calibration.
For the highest accuracy, calibrate all the head positions that you will use for your measurements.